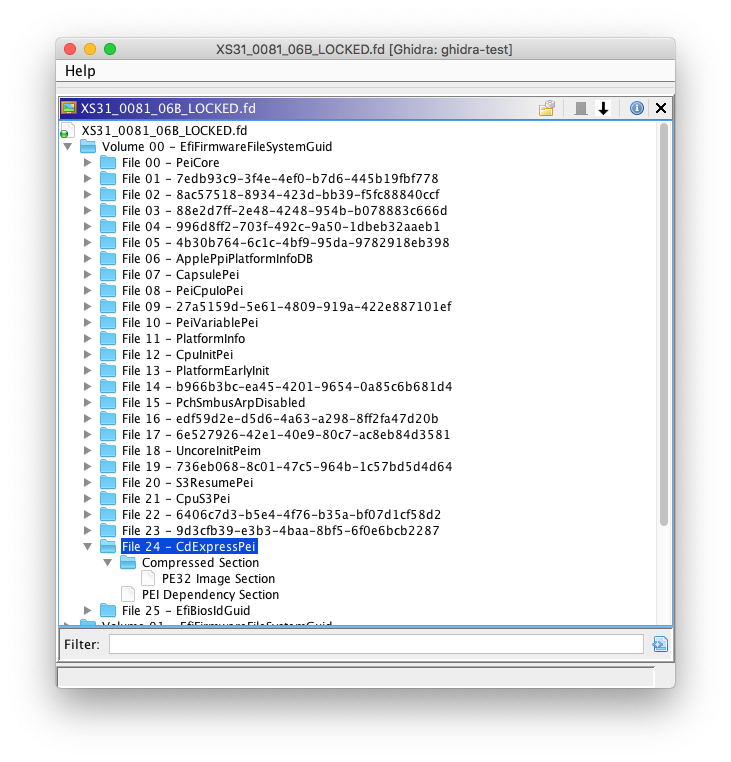
Hello everyone. It’s been a few weeks since I’ve written my last blog post, and during that time I’ve been working on the FS loader for UEFI firmware images. This FS loader aims to implement functionality similar to UEFITool in Ghidra.
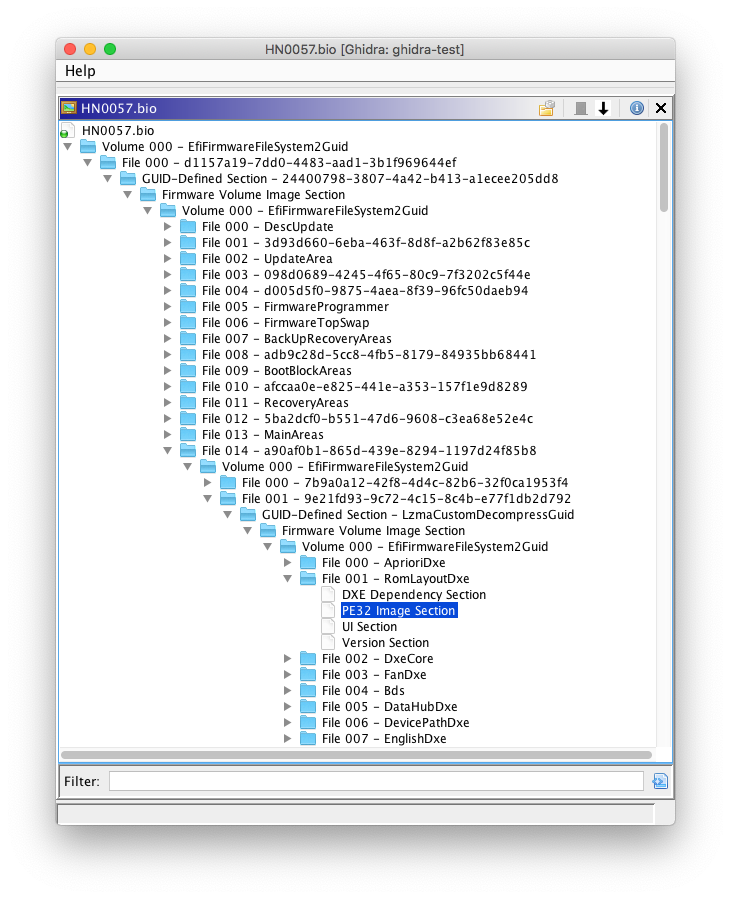
As described in the previous blog post, Intel platforms divide the flash chip into several regions, including the BIOS region. On UEFI systems, the BIOS region is used to store UEFI firmware components, which are organized in a hierarchy. This hierarchy begins with UEFI firmware volumes, which consist of FFS (firmware file system) files. In turn, these FFS files can contain multiple sections. Firmware volumes can also be nested within FFS files. This helpful reference by Trammell Hudson as well as this presentation from OpenSecurityTraining have some additional information regarding UEFI firmware volumes.
For example, a UEFI firmware implementation could have a firmware volume specifically for the Driver eXecution Environment (DXE phase). Stored as FFS files, DXE drivers within the firmware volume could consist of a PE32 section to store the actual driver binary, as well as a UI section to store the name of the driver.
So far, I’ve implemented basic firmware volume parsing in the FS loader; I’ve pushed this to the GitHub repository. Currently, this doesn’t handle FFS file or section parsing.
FFS file and section parsing is still a work-in-progress, but here’s a preview:
This is mostly complete, but there are still some nasty bugs related to FFS alignment that I’m working on fixing. My focus for this week is to finish up this FS loader.
Update (2019-07-19)
I have committed support for UEFI FFS file/section parsing in the GitHub repo. Please open an issue report if you encounter any issues with it (such as missing files/sections that UEFITool or other tools parse without issues).
Hello again! It’s been three weeks since my last post (well, one of those weeks I was on vacation, so more like two weeks), so there are many many updates to write about. If you recall from my last post, Coverity has been down for maintenance, so I started looking around for other things to do. Here is a list of some of the highlights:
Coverity isn’t the only static analyzer we use – coreboot also runs nightly scans using the Clang Static Analyzer, an open source tool from the LLVM project. The results from these scans aren’t as detailed as Coverity and unfortunately contain many duplicates and false positives, but I was able to submit patches for some of the issues. Usability of the analyzer is also still somewhat limited, since we have no way of recording fixes for past issues or ignoring false positives. (A framework like CodeChecker might be able to help with this.)
coreboot will (hopefully) soon be (almost) VLA free! Variable length arrays (VLAs) were a feature added in C99 that allows the length of an array to be determined at run time, rather than compile time. While convenient, this is also very dangerous, since it allows use of an unlimited amount of stack memory, potentially leading to stack overflow. This is especially dangerous in coreboot, which often has very little stack space to begin with. Fortunately, almost all of the VLAs in coreboot can be replaced with small fixed-sized buffers, aside from one tricky exception that will require a larger rewrite. This patch was inspired by a similar one for Linux, and is currently under review.
Similar to the above, coreboot will also soon be free of implicit fall throughs! Switches in C have the unfortunate property of each case statement implicitly falling through to the next one, which has led to untold number of bugs over the decades and at least 38 in coreboot itself (by Coverity’s count). GCC however recently added the -Wimplicit-fallthrough warning, which we can use to banish them for good. As of this patch, all accidental fall throughs have been eliminated, with the intentional ones marked with the /* fall through */ comment. Hopefully this is the last we see of this type of bug.
coreboot now has a single implementation of <stdint.h>. Previously, each of the six supported architectures (arm, arm64, mips, ppc64, riscv, and x86) had their own custom headers with arch-specific quirks, but now they’ve all been tidied up and merged together. This should make implementing further standard library headers easier to do (such as <inttypes.h>).
Finally, many coreboot utilities and tools such as flashrom, coreinfo, nvramtool, inteltool, ifdtool, and cbmem have stricter compiler warnings, mostly from -Wmissing-prototypes and -Wextra. Fixing and adding compiler warnings like these are very easy to do, and make great first time contributions (-Wconversion and -Wsign-compare in particular can always use more work).
That’s it for this week! Thankfully Coverity is back online now, so expect more regular blog posts in the future.
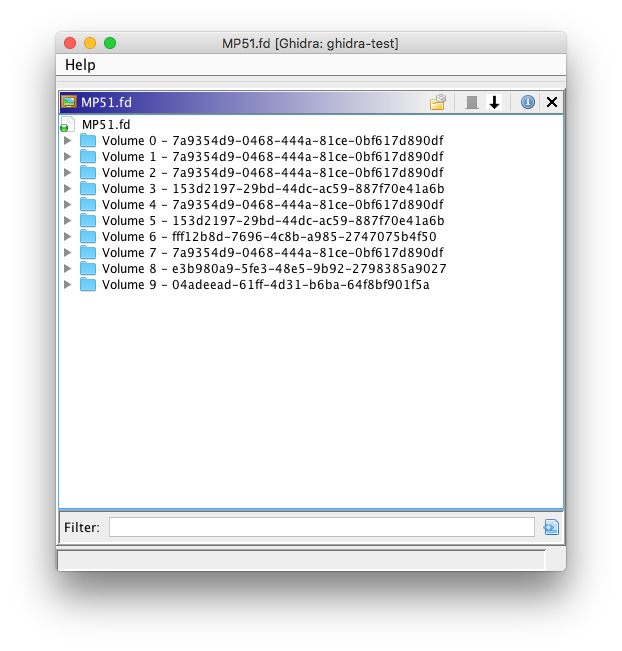
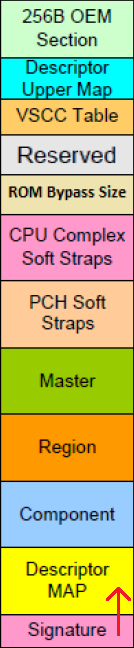
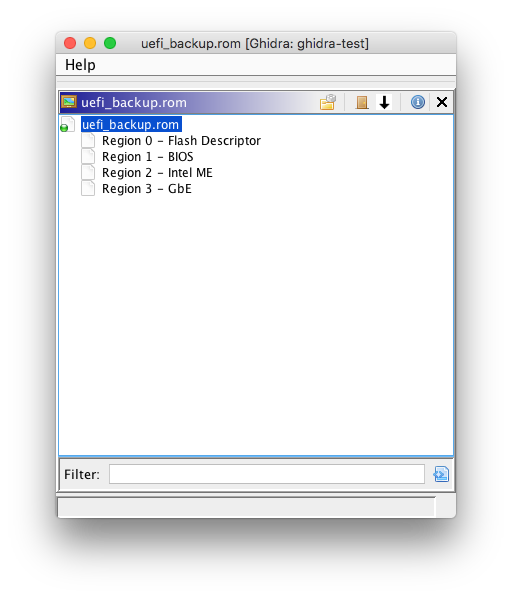
Hi everyone. As stated in my previous blogpost, I have been working on a FS loader for Intel Flash Descriptor (IFD) images. The IFD is used on Intel x86 platforms to define various regions in the SPI flash. These may include the Intel ME firmware region, BIOS region, Gigabit ethernet firmware region, etc. The IFD also defines read/write permissions for each flash region, and it may also contain various configurable chipset parameters (PCH straps). Additional information about the firmware descriptor can be found in this helpful post by plutomaniac on the Win-Raid forum, as well as these slides from Open Security Training.
For a filesystem loader, the flash regions are exposed as files. FLMAP0 in the descriptor map and the component/region sections are parsed to determine the base and limit addresses for each region; both IFD v1/v2 (since Skylake) are supported. Ghidra supports nested filesystem loaders, so the FMAP and CBFS loaders that I’ve previously written can be used for parsing the BIOS region.
If you encounter any issues with the IFD FS loader, please feel free to submit an issue report in the GitHub repository.
Plans for this week
I have started working on a filesystem loader for UEFI firmware volumes. In conjunction with the IFD loader, this will allow UEFI firmware images to be imported for analysis in Ghidra (behaving somewhat similar to the excellent UEFITool).
Hello again! If you recall from my last post, the schedule this week is to fix the issues in northbridge/via and southbridge. However, Coverity is going through a major internal upgrade, and so the issue tracker has been offline all week. Luckily though I was able to fix most of these issues last week, so assuming the upgrade finishes soon I won’t be behind schedule. In the mean time, I decided to try flashing coreboot onto my T500, since the last component I was waiting for arrived last week. Here is a little mini-guide to my (sometimes harrowing) flashing experience.
Supplies
ThinkPad T500
BeagleBone Black
5V 2A power adapter for the BBB
Jumper Wires
Pomona 5252 Test Clip
Atheros AR9462 Wireless Card
Updating the EC
It is generally recommended to update the embedded controller firmware before flashing coreboot, which can only be done during a Lenovo BIOS update. (Unlike Chromebooks, ThinkPads unfortunately do not have open source EC’s.) I was able to find a copy of the latest BIOS on the Lenovo EOL Portal, and attempted to perform an update … which froze and crashed halfway through. Uh oh. This is OK, as long as I don’t restart the computer I can just try flashing it again, right? Wrong! The next time I tried it Windows ran into a fatal error and decided to force a restart for me (gah!). Upon booting it up again, I was met with absolutely nothing, because the screen wouldn’t even turn on. More than a little concerned that I had bricked it, I searched through online forums until I stumbled across the Crisis Recovery tool. Apparently, old ThinkPads have a method to force-update the BIOS from an external USB stick or floppy (if you have one of those lying around). The recovery tool had to be run in Windows XP Service Pack 3 emulation mode, and seemed to format the USB correctly. My ThinkPad wasn’t so impressed, and obstinately refused to recognize the stick. As a last hope, I asked around on IRC what to do, and Nico Huber informed me that the ThinkPad was likely not dead, and that I could just proceed with flashing coreboot anyway. Well, here goes nothing.
Building Coreboot
So we’re going to flash coreboot, but what options do I pick when compiling it? I scoured around the internet to find tutorials for flashing coreboot onto a T500 and other related ThinkPads, but they all recommended different options, sometimes contradictory. Hmmmm. Once again going back to IRC, Angel Pons helped me configure a very minimal build.
General setup ---> [*] Use CMOS for configuration values
              ---> [*] Allow use of binary-only repository
Mainboard ---> Mainboard vendor ---> Lenovo
          ---> Mainboard model ---> ThinkPad T500
Devices ---> Display ---> Linear "high-resolution" framebuffer
Now, the T500 is a very special laptop, in that it can run coreboot without any binary blobs at all. However, I decided to enable microcode updates anyway, since they provide important stability improvements (like not crashing). This laptop also comes with an Intel ME which can be completely wiped, but I decided to leave that for later. (Now that I know coreboot works, there will be a follow-up post in several weeks when I do that.)
Disassembly and Flashing
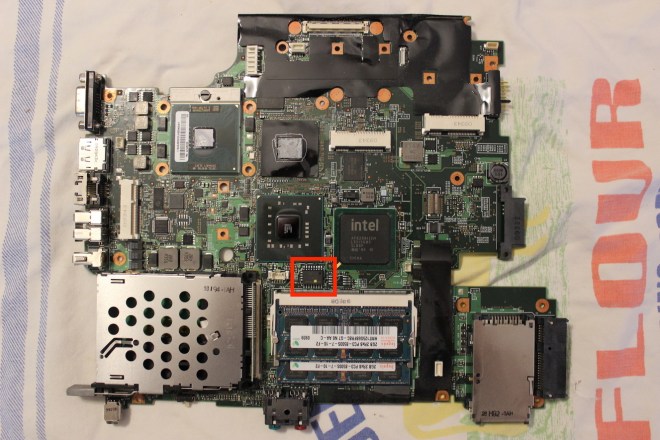
Like most laptops, the flash IC of the T500 is locked from the factory, and requires an initial external flash to install coreboot (afterwards, subsequent flashes can be done internally). This requires disassembling the laptop to access the SOIC-16, which is buried in the bowels of the T500 case and requires a complete tear-down to access. The Libreboot T500 page gives you a feel for the amount of work required to extract the motherboard, which along with the hardware maintenance manual I referred to extensively.
SOIC-16 highlighted in red
With the motherboard extracted from the case, the next step is to attach the Pomona 5252 to the SOIC-16 and jumper it to the BBB, which was all made very easy by this X200 guide. Somewhat blithely following the previous guide, I set up an old ATX PSU to provide 3.3v to the flash chip. However, whenever I connected it to the test clip, it would always power itself off. Strange. Going back to IRC, Nico informed me that this is in fact A VERY BAD AND DANGEROUS THING TO DO. THE INTERNET IS LYING – DO NOT USE AN ATX PSU, YOU COULD FRY YOUR MOTHERBOARD! Oops. After puzzling over how to provide enough power to the chip without the PSU, Patrick Rudolph chimed in that a) the T500 motherboard is basically indestructible (whew!), and b) the flasher itself should be able to provide enough power. Hooking the 3.3v cable into the BBB instead, I tried reading the flash chip.
$ flashrom -p linux_spi:dev=/dev/spidev1.0,spispeed=512
(a bunch of output that I forgot to write down)
It works! Even with a bricked Lenovo BIOS, it is still recommended to keep a backup, so next we read the old factory ROM.
Do this three times with three distinct images, and compare their SHAsums to make sure they are all identical (otherwise the connection might be faulty). If they all match, keep one as a backup.
Note that because I left the ME as-is, it is important to only flash the BIOS region, not the entire chip.
Reassembly and Testing
Sadly, no instant gratification here – I had to reassemble half the laptop before I could test booting it up. However, after doing so and gingerly pressing the power button, I was greeted by the lovely SeaBIOS boot menu. It actually worked! Huzzah! Finishing reassembly, I replaced the factory Intel wireless card with an Atheros AR9462, which can run without any binary firmware. After installing Debian, I now have a laptop running completely free and open source software, all the way from the BIOS up (well, except for the ME, but I’ll fix that later).
T500 running coreboot and Debian 9
For the final icing on the cake, here is a fresh board status report for the T500. Many thanks to everyone who helped me in this process.
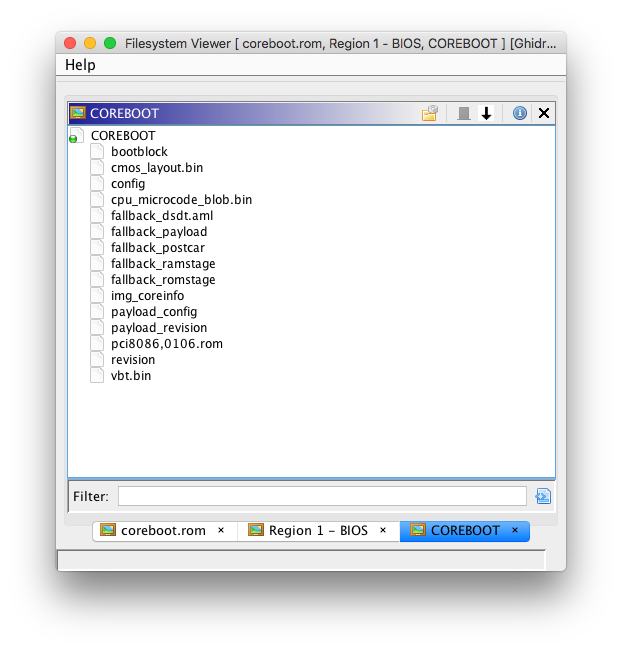
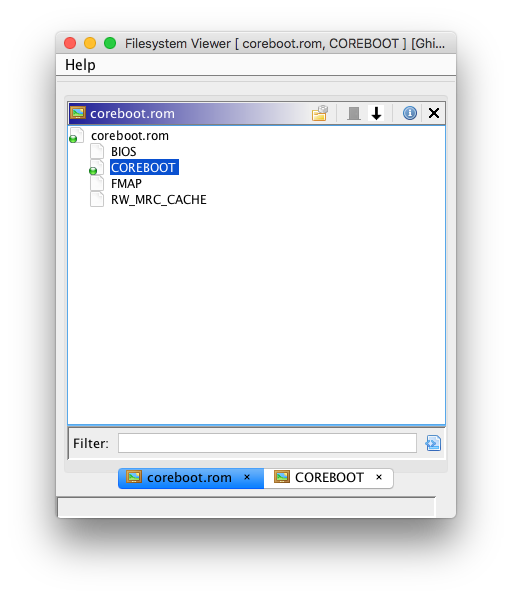
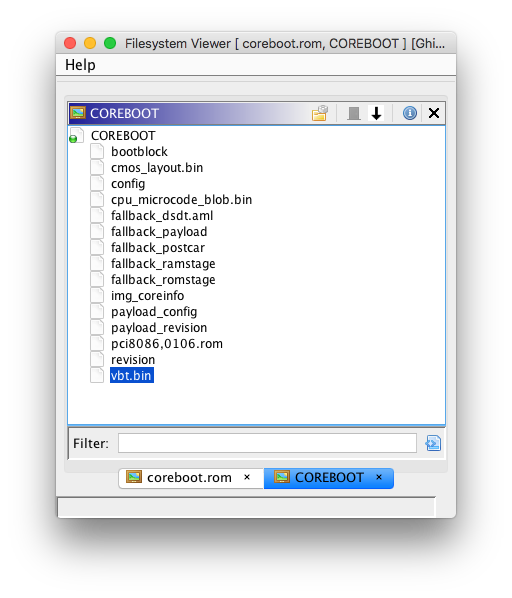
During the previous week, I worked on additional filesystem loaders to support parsing Flash Map (FMAP) images and the coreboot file system (CBFS). As of this week, these FS loaders are mostly complete, and can be used to import raw binaries within compiled coreboot ROMs. Support for CBFS file compression (with either LZMA or LZ4) is also implemented; compressed files will be automatically extracted. Here are some screenshots of the new FS loaders:
While these might not be the most useful FS loaders (as FMAP and CBFS are mainly used by coreboot itself), I gained additional familiarity with Ghidra’s plugin APIs for FS loaders. This will be useful, as I will be writing additional FS loaders for this project.
Plans for this week
I’ll continue to make minor changes to the existing FS loaders (various cleanups/etc). I’ll also start to write a FS loader for parsing ROMs with an Intel firmware descriptor (IFD), which shouldn’t be too complicated. After this is completed, I plan on writing a FS loader for UEFI firmware volumes (ideally similar to UEFITool or uefi-firmware-parser). I anticipate that this loader will be more complex, so I’ve reserved additional time to ensure its completion.
Hello again! This is a continuation of my posts about fixing the Coverity issues in coreboot. This week’s plan was to tackle the 28 issues in northbridge/intel, which turned out to be much easier than I expected, since I’m already done! With that out of the way, I’m going to begin working on northbridge/via and southbridge. For the curious, here is the project timeline for entire summer. (I had wanted to include this in last week’s post, but hadn’t figured out how to do tables in WordPress yet.)
Week
Components
Issues
May 6 to 10
util
22
May 13 to 17
util, payloads
22
May 20 to 24
arch, drivers
20
May 27 to 31
commonlib, cpu, lib, mainboard
22
June 3 to 7
northbridge/amd
21
June 10 to 14
northbridge/intel
28
June 17 to 21
northbridge/via, southbridge
22
June 24 to 28
soc/intel
21
July 1 to 5
soc/rockchip, soc/nvidia
20
July 15 to 19
soc/misc, vendorcode/cavium
26
July 22 to 26
vendorcode/amd
21
July 29 to Aug 2
vendorcode/amd
21
Aug 5 to 9
vendorcode/amd
20
Aug 12 to 16
vendorcode/amd
20
Aug 19 to 23
vendorcode/amd
20
As you can see, there are a lot of issues in the AMD vendorcode. This consists primarily of AGESA, AMD’s framework for initialization of their 64 bit platforms (somewhat similar to Intel’s FSP). This code is somewhat … dense (someone on IRC described it as a “sea of abstraction”), so I made sure to leave plenty of time for it. As always, you can keep up to date on my current progress on Gerrit.
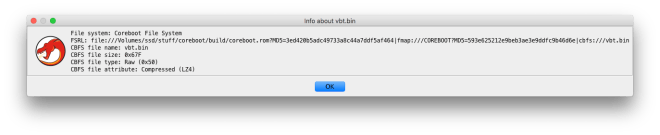
PS: As an extra bonus, here is a picture of my new BeagleBone Black!
I recently got a ThinkPad T500 to practice installing coreboot on, and I needed some sort of external programmer to flash the SOIC. There are many options available (flashrom has a whole list here), but a single-board computer like this is one of the closest you can get to “plug-and-play.” There are many other popular boards (notably the Raspberry Pi), but the BBB doesn’t require any binary blobs to boot, and is open source hardware too. The only thing I’m waiting for now is an Atheros ath9k wireless card, which runs without any binary firmware. (Hey, if you’re gonna go freedom, you gotta go all the way.)
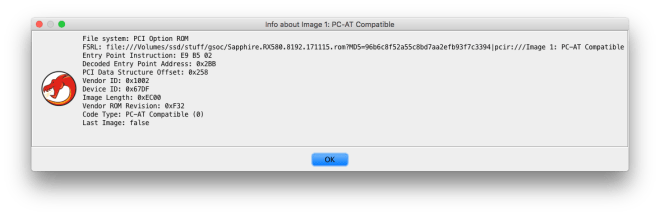
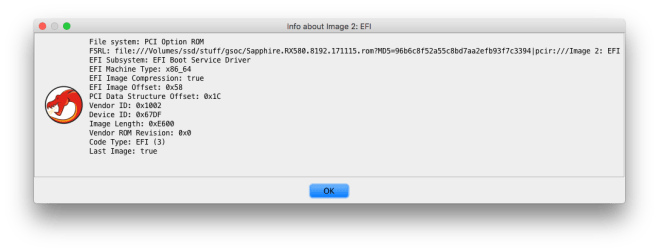
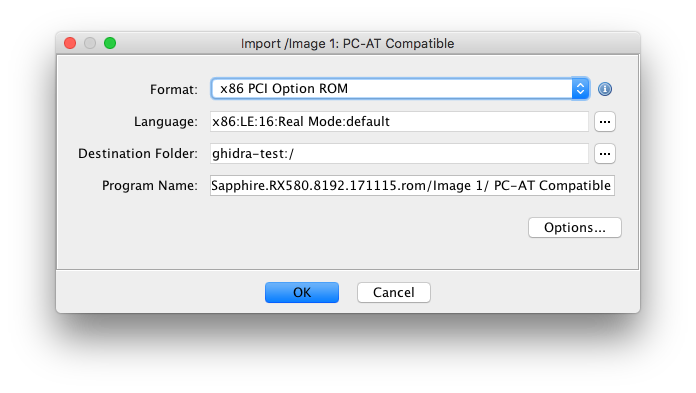
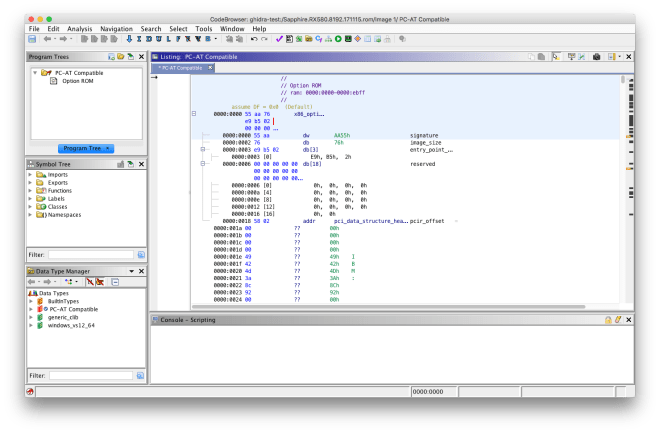
Last week, I finalized my work on the PCI option ROM loader, which was the first part described in my initial proposal for this project. This consists of a filesystem loader for hybrid/UEFI option ROMs and a binary loader for x86 option ROMs.
Background information on PCI option ROMs
Option ROMs may contain more than one executable image; for example, a graphics card may have a legacy x86 option ROM for VGA BIOS support as well as a UEFI option ROM to support the UEFI Graphics Output Protocol. x86 option ROMs are raw 16-bit binaries. The entry point is stored as a short JMP instruction in the option ROM header; the BIOS will execute this instruction to jump to the entry point. In contrast, UEFI images contain an UEFI driver, which is a PE32+ binary. This binary can be (and frequently is) compressed with the EFI compression algorithm, which is a combination of Huffman encoding and the LZ77 algorithm.
Filesystem loader
The filesystem loader allows hybrid/UEFI option ROMs to be imported. It also transparently handles the extraction of compressed UEFI executables.
Initially, I attempted to write a Java implementation of the EFI Compression Algorithm for use in the FS loader, but ran into several issues when handling the decompression of certain blocks. I eventually decided to reuse the existing C decompression implementation in EDK2, and wrote a Java Native Interface (JNI) wrapper to call the functions in the C library.
With the FS loader, UEFI drivers in option ROMs can be imported for analysis with Ghidra’s native PE32+ loader.
x86 option ROM binary loader
This loader allows x86 option ROMs to be imported for analysis. Various PCI structures are automatically defined, and the entry function is resolved by decoding the JMP instruction in the option ROM header.
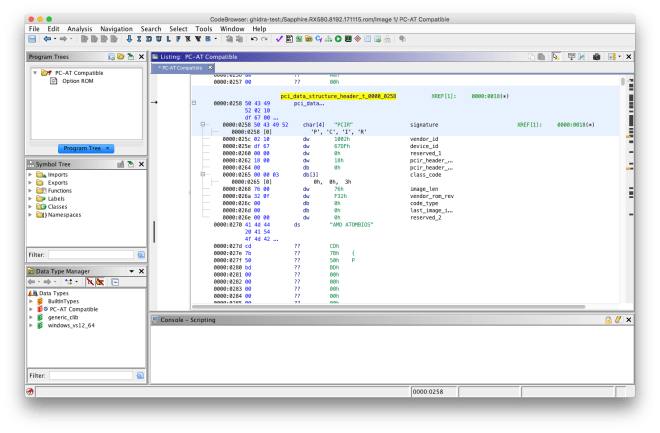
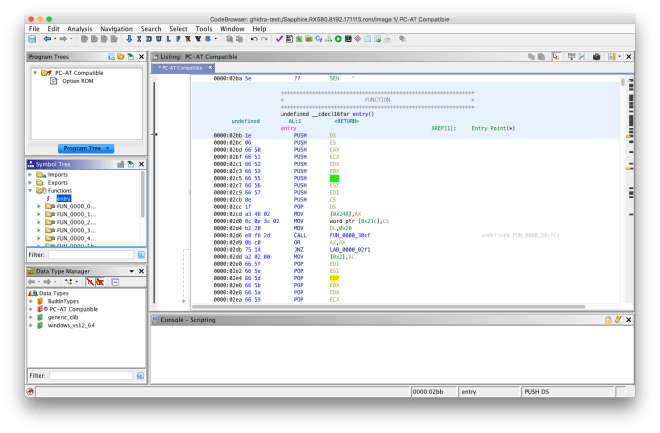
PCI option ROM header data typePCI data structure data typeDisassembled entry point
Plans for this week
I’ve started to work on filesystem loader for FMAP/CBFS (used by coreboot firmware images). After that, I plan on working on additional FS loaders for Intel flash images (IFD parsing) and UEFI firmware volumes.
As usual, the source code is available in my GitHub repository. Installation and usage instructions are included in the README; feel free to open an issue report if anything goes awry.
Hello everyone! My name is Jacob Garber, and I am a student in this year’s GSoC 2019! My project is on making coreboot Coverity clean. Coverity is a free static-analysis tool for open source projects that searches for common coding mistakes and errors, such as buffer overruns, null pointer dereferences, and integer overflow. Coverity automatically analyzes the coreboot codebase and flags issues it finds, and my job is to classify them into bugs and false-positives and patch them if I can. You can check the Coverity overview for coreboot here, though seeing the issue tracker itself requires registration. At the beginning of the summer, coreboot had over 380 flagged issues, but it’s now down to 303, so we’re making progress! I plan to address 20-30 issues per week depending on the source component, which so far has gone surprisingly well (surprising, in the sense that coming into the summer I knew very little about coreboot or firmware development in general). For the curious, you can see the history and progress of all my changes on Gerrit. My mentors for this project are Patrick Georgi, Martin Roth, and David Hendricks, who have all been extremely helpful in guiding me through the development process, reviewing my patches, and answering my many questions. Thank you all.
Now, fixing Coverity bugs isn’t the only thing I’d like to do this summer. As I said before, I’d like to learn more about coreboot, and what better way to do that than installing it on a laptop! My current laptop is an old 2011 Macbook Air, which is surprisingly close to getting coreboot support (many thanks to Evgeny Zinoviev). However, I am (slightly) hesitant about installing yet-experimental firmware on my one and only development machine, so until then I picked up an old Thinkpad T500 to practice on. This laptop has the advantage of being able to run blob-free, and if in the very unlikely event I end up bricking it, who cares! (I mean, I’ll care, but it was a worthy sacrifice.) I also bought a BeagleBone Black to try out external flashing and was hoping to include a picture today, but the shipping was delayed. You’ll have to wait until next week!
Hi everyone. I’m Alex James (theracermaster on IRC) and I’m working on developing modules for Ghidra to assist with firmware reverse engineering as a part of GSoC 2019. Martin Roth and Raul Rangel are my mentors for this project; I would like to thank them for their support thus far.
Ghidra is an open-source software reverse engineering suite developed by the NSA, offering similar functionality to existing tools such as IDA Pro. My GSoC project aims to augment its functionality for firmware RE. This project will consist of three parts: a loader for PCI option ROMs, a loader for firmware images, and various scripts to assist with UEFI binary reverse engineering (importing common types, GUIDs, etc).
The source code for this project is available here.
Week 1
During my first week, I started implementing the filesystem loader for PCI option ROMs. This allows option ROMs (and their enclosed images) to be loaded into Ghidra for analysis. So far, option ROMs containing uncompressed UEFI binaries can be successfully loaded as PE32+ executables in Ghidra. The loader also calculates the entry point address for legacy x86 option ROMs.
Plans for this week
So far this week, I’ve worked on writing a simple JNI wrapper for the reference C implementation of the EFI decompressor from EDK2, and have used this to add support for compressed EFI images to the option ROM FS loader. Additionally, I plan on making further improvements to the option ROM loader for legacy option ROMs; while the entry point address is properly calculated, they still have to be manually imported as a raw binary.
GSoC 2016 coding period has come to an end and mentor’s evaluating students this week. It has been an enriching 13 weeks of reading datasheets, designing structures, coding, learning and hanging out over IRC! 😛 I’d like to take this opportunity to present my work and details on how to use it. 🙂
Firstly, to offer context to the work, here is a list of public mails and blog posts. These should give an idea as to how the discussions and work evolved. A lot of the discussions have happened over IRC, but #flashrom does not keep any logs.
You can also find these over at flashrom’s patchwork. The mailing list is where the review happens (although a better alternative, IMHO, is Gerrit which coreboot uses). The patches aren’t currently merged and are under review. In any case, you are most welcome to join review (which will likely be very helpful for me). 🙂 If you’d like to look at something more on the bleeding edge, then I invite you to my GitHub.
Now, moving on how to use the work. The most exhaustive documentation on how to use it is the code itself :P, but in the following list I attempt to list scenarios –
For SPI chips that have multiple status registers, flashrom’s verbose output will print the status register bits and there values. Most bits are named, i.e., the datasheet refers to the bit by an abbreviation, for instance, WEL for Write Enable Latch, WIP for Work In Progress, BP for Block Protect, LB for Lock Bit and so on. The verbose output will print these names, both in abbreviated and long forms, for most chips (and these abbreviations tend to be generic across many manufacturers). However, the process for adding new chips that leverage this, and adding new bits, is a fairly easy task (I would invite you to have a look at the code 😉 for more details). The verbose output also prints the write protection mode for status register(s) in effect (software protected, hardware protected, power cycle lock down and so on).
In case you want to disable or enable (a particular type) write protection for status register, you can use the --wp-disable or --wp-enable[=MODE] respectively (where MODE is either of software, hardware, power cycle or permanent – you are encouraged to have a look at the man page 🙂 for more details)
In case you want to protect a particular range of an SPI chip from writes or erases, you will need to alter the BP, TB or SEC bits. Currently, there is a CLI that will enable you to accomplish all that. 😛 First, you’ll want to look at the list of ranges your SPI chip supports – run flashrom with --wp-list. Take note of the start address and the length of the memory range you want to protect. Then again run flashrom with --wp-set-range start=0xfff000,len=4 (0xfff000 and 4 are for representational purpose only). By now the memory range is protected, but you can additionally enable status register write protection by following what the foregoing point described.
For SPI chips that support OTP, you can read, write and erase OTP regions (of course for supported chips :P). For OTP operations, you have at your disposal --print-otp-status, --read-otp [,reg=], --write-otp file=[,reg=], --erase-otp [reg=] and --lock-otp [reg=]. You can read the OTP memory to a file, or you can write to the OTP region from a file, very much like reading and writing from/to SPI chip. For more details, I would again like to point you to the man page. 🙂
Since this is a work-in-progress, the CLI may change (and is very likely). Currently around 10% of SPI chips use this new infrastructure. Models of a few manufacturers (and especially exotic ones like Atmel) are yet to be fully incorporated. You are most welcome to add support for new chips or update the existing ones to support new infrastructure. 🙂
I would like to sincerely thank my mentors Stefan and David for their support and help. I am indebted to them for this opportunity and I hope that we continue to share this relationship in the future while I continue to explore and contribute to flashrom. It has been a pleasure getting to know each of them. I’d also like to thank Urja for pitching in from time to time 🙂 It was fun hanging out over IRC and helping folks asking questions there. And I am looking forward to it for years to come. 😛
In the next and final part of this post, I will highlight how we intend to improve upon this work in the future, where it will be headed and what more we have in store, so please stay tuned. 😉 Phew, this was a long one, and rightly so as it attempts to summarise a great deal of experiences. If you have any feedback, questions or comments on the blogs or code, please feel to ping me on #flashrom where I am known as hatim. You can also email me at hatim@hatimak.me.
Thanks, and looking forward to hearing from you. 🙂 See you in the next and final part.