CCCamp 2015

We had an table on the cccamp 2015 in Mildenberg. The cccamp (chaos communication camp) is one of Europe big hacker events every 4 years where several hackers come together and do camping. Everybody could relax a little bit and talk to each other in a nice background. The camp infrastructure contained own wifi, dect, gsm network and a 10 GBit uplink in the middle of nowhere. You could give your tent a 1 Gbit uplink to the internet ;).

Our table was in the BER village, named to the never finished airport near Berlin, Germany. Several people from the coreboot community showed up (CareBear, felix, mue, paulk-collins, tnias, zaolin, […]) and we shared a lot of ideas to each other. In that way we flashed several laptops, replaced some WSON chips with SOIC-8’s. Also we’ve found another bug in the sandybridge ram init, a fix is waiting for merge on gerrit #11248.
paulk-collins came by to talk about a EC open source firmware for the ENE KBxxx embedded controllers.
One of the MAME hackers visited us to get ideas how to port a Dell notebook (ENE KBxxx based EC).
Felix did some work on ME as well other hackers joined him.
Tnias and zaolin started the idea of a raspberry pi doing all the flashing including detection of the device. This could let us drink more Mate while other do the flashing themself.
In the end a thunderstorm reached our tent and we had to evacuate it.

Hopefully everybody can come to Bonn this year.

[GSoC] End user flash tool – week #10 #11 #12

Hello!

During weeks 10, 11 and 12 I worked on:

  • functions for gathering hardware specific data
  • automating process of building coreboot image
  • GUI improvements
GATHERING HARDWARE SPECIFIC DATA

As I mentioned in my last post, if coreboot image should be built automatically then application needs to collect hardware specific data. During last weeks I added functions responsible for:

  • dumping VGABIOS from memory: Some systems (like Lenovo T60 with ATI graphics) require adding VGABIOS dumped from memory to coreboot image, because factory BIOS patches it at runtime, so in certain cases using option rom extracted from factory BIOS may not work
  • getting EDID data: to know what type of display panel is used in system
  • getting motherboard model name: this is mandatory to recognize if we can install coreboot in system or if we have known working configuration
AUTOMATING PROCESS OF BUILDING COREBOOT IMAGE

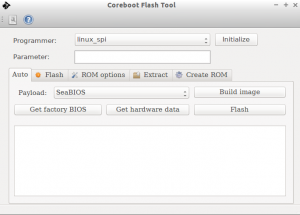
It is now possible to build and flash coreboot image by clicking few application buttons without taking care which options are correct for system. Of course this is not possible for all hardware configurations, for now this is very limited, but with time database of known good configurations will grow and more users will be able to flash coreboot in such easy way.

flash_tool_auto_tab

Process of automated image building:

  1. Check if working configuration for system is known.
  2. Check if configuration requires additional option rom.
  3. If necessary, add option rom extracted from factory bios or extracted from running system memory.
  4. Build image.
GUI IMPROVEMENTS

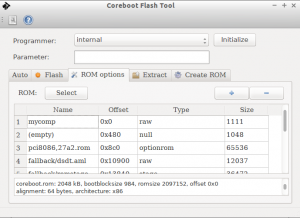
I decided to change a look of ‘ROM options’ tab. Previously just raw output of cbfs_tool with rom contents info was redirected to GUI log window. Now it is visible in a form of table, what in my opinion is more readable.

cbfs_tool_GUI

LAST WEEK AND FURTHER PLANS

GSoC “pencils down” date is coming up on Friday, so only few days are left. I want to use this time for:

  • writing project documentation
  • looking for bugs and fix them
  • code cleanup
  • adding new working configurations and testing them (I need your help with it)
  • change debug messages to information popups

What after GSoC? I would like to still contribute, there is place for many improvements and possible extensions.

2015-08-14 Librem 13: Weekly Progress Update

A question coreboot developers are commonly asked is this: “can you port coreboot to my board?”

For my first coreboot post I’d like to show some of the steps required to port coreboot to the Librem 13. In particular, this post is a good example of some of the challenges involved in such a port.

This post is also the first weekly progress update for the Librem 13. Please email me with questions or comments: larry.moberg@puri.sm.

LPC Bus

The Librem 13 has convenient test points for the LPC bus. This allows a bed-of-nails test setup to quickly diagnose problems during manufacturing. But it has the added bonus of facilitating coreboot development.

The earliest coreboot stages are the most important to get right. Debugging using port 0x80 writes on the Librem 13 is possible because port 0x80 writes are configured as LPC writes, which can be traced by connecting to the LPC pins.

And…It’s Gone

BIOS development is hard. I applied a little too much force on the SPI flash chip and tore the solder pads off the board.

Pads...gone

I attached the LPC connection to a test setup and didn’t check using a multimeter before applying power. LAD2 was shorted to LAD3. This immediately bricked the laptop without even releasing any smoke. Remembering to double check for shorts is a tedious but important lesson.
Don't Cross The Streams

The LPC bus wires go under the board. Don’t Cross The Streams!

Why It Matters

Imagine a laptop where the LPC bus is only available by soldering directly to the pins of the EC. Yes, they exist! That level of fine soldering is a significant barrier for future coreboot hackers. (The Librem 13’s external USB ports are all USB 3, which makes an EHCI debug port harder, but the LPC bus is a good substitute.)

Porting coreboot to a new laptop takes a lot of time and work. Even a good laptop design like the Librem 13 where the LPC pads are available still has a non-trivial level of engineering work to get to a Free Software BIOS.

Next week, I’ll document the engineering considerations around writing to the SPI flash chip, and how that affects coreboot development.

[GSoC] End user flash tool – week #7 #8 #9

Hello!

During weeks 7, 8 and 9 I worked on:

  • functions for gathering hardware specific data
  • extending libflashrom
  • GUI improvements
  • testing
GATHERING HARDWARE SPECIFIC DATA

Main purpose of End user flash tool project is to provide an easy way to build and flash coreboot ROM. To achieve it there is a need to collect hardware specific data such as:

  • lspci -nn output: information about all PCI buses and devices in the system, it is possible to recognize a graphic card, its vendor and device codes
  • dump of factory BIOS: it is important to make a copy of factory BIOS in case something will go wrong, but not only in this case, very often there is a need to use a VGABIOS extracted from factory BIOS if particular graphic card or display panel is present in our system, it is the best to make dump two times and then check if files are the same (for example by comparing hashes)
EXTENDING LIBFLASHROM

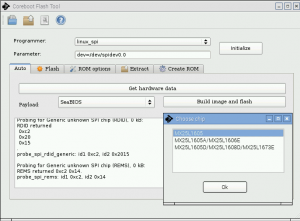
Sometimes when flashrom probes for all known chips there are multiple chips found. I needed to implement a function which will return all such chips to GUI. Now in this case it is possible to just select which chip is correct by clicking a proper one in dialog box.

choose_chip

GUI IMPROVEMENTS

I decided to change a bit visual design of the app. There is a new (but most important for the project)  tab – ‘Auto’. In this tab it is possible to gather hardware specific data, which will be then used in a process of automatic building of coreboot image and flashing. I also decided to move programmer selection combobox from ‘Flash tab’ to main application window and  add edit text field for parameters.

LOOKING FOR TESTERS

GSoC ends in next week, application is almost done (but will be improved and extended also after GSoC), so this is time for some testing! I would be very grateful if some of you could help me with it. It would be the best if you have Lenovo T60 and external programmer. First there is a need to collect some hardware specific data and then it would be possible to check if application creates working coreboot image basing on this data. So it is not only about testing, but also about making white list of hardware configurations bigger to let more users flash their hardware with coreboot in easy way!

Please contact me on:

  • IRC #flashrom #coreboot: lukaszdm
  • e-mail: lukasz.dmitrowski@gmail.com

Thanks in advance!

coreboot changelog – Weeks of 2015-07-27 and 2015-08-03

This covers commits ef0158ec up to commit 1cbef1c
Development is typically slower during the summer and 2015 is no exception, so the report switches to a biweekly installment for a while.

The last two weeks have seen improvements in our development tools:
coreboot upstream can now build Chrome OS boards with Chrome OS features (verified boot, interaction with Chrome EC, flash based error logging) enabled, and the projects builders at http://qa.coreboot.org/ are now routinely building these configurations alongside the regular default configs for all boards.
The builders now run ‘make what-jenkins does’ (see coreboot/Makefile.inc) instead of a hard-coded set of commands, which provides the community the capability to adapt the test build without admin intervention.
When adding the .config used for building an image into said image, it’s now minimized which gives visibility to the relevant changes to the config compared to the board’s defaults.
Kconfig features a strict mode, which acts as a ‘warnings-as-errors’ equivalent and fails the build if kconfig would emit any warning. Since we still have a couple of those in the tree, it’s not enabled yet.
For users of cscope or ctags, we now have new make targets to create tree-wide indexes (make ctags-project cscope-project).

Reproducible builds got a boost by fixes to the build.h generator script, which can finally emit stable timestamps based on the git revision, instead of the local time.

External payload integration was coalesced within payloads/external, with more work in progress. The integrated SeaBIOS build can now also be used when building with ccache. libpayload gained robustness in different developer environments, being smarter about looking for compilers, configs and include files in all the right places.

On the Free Software side, more microcode blobs were moved to the 3rdparty/blobs repository and one false positive that libreboot’s blob detector tripped over was eliminated, and with a little more progress, it should soon be possible to build from a fully blob-free coreboot tree. Before you get your hopes up, please note that the result may not be very useful on a lot of boards, so more care must be taken.

The effort to make coreboot capable of booting in 64bit mode on x86-64 is still ongoing and saw the integration of more commits.

coreboot should have an easier time again when building on Cygwin and BSD systems.

Skylake was the chipset with the largest amount of work in the 2 weeks, but there was also the addition of a coreboot port for RISC-V’s Spike ISA Simulator, contributions to the AMD Bettong mainboard and its chipset drivers, as well as fixes and cleanups to AMD K8 and Intel i945.

In terms of style, a bunch of extraneous whitespaces, indenting errors and FSF addresses were also dealt with.

[GSoC] coreboot for ARM64 Qemu – Week #8

As I had discussed in my last blog post, currently I am onto the debug of the qemu boot. I was intending to use Valgrind tools to detect various memory managements bugs and use that information for my debug. But sadly the information provided by Valgrind was not of much use since it didn’t deal with the execution stream of the coreboot code in qemu. I ultimately had to turn to gdb and use it for further debug.

This was an initial hiccup, since, as in my last post, building aarch64-linux-gnu-gdb on MacOSX was not straightforward, since there was no direct replacement for the “gdb-multiarch”. I was able to get this done. I discuss some of the basic steps of how to set it up below.

First, we need a couple to packages to build gdb. They are listed below:

expat guile texinfo

Next, download the aarch64-gdb from here. Now, you need to configure CC to gcc (GNU gcc and not the innate symlink to clang). Then proceed to,

$ ./configure --target=aarch64-linux-gnu
$ make
$ make install

If this completes successfully, you would have aarch64-gdb installed on your system correctly. The important thing to remember is to use GNU gcc (>=4.9) and not the innate MacOS gcc.

To run gdb you must

$ aarch64-linux-gnu-gdb

The output looks like this :

GNU gdb (GDB) 7.9
Copyright (C) 2015 Free Software Foundation, Inc.
License GPLv3+: GNU GPL version 3 or later <http://gnu.org/licenses/gpl.html>
This is free software: you are free to change and redistribute it.
There is NO WARRANTY, to the extent permitted by law.  Type "show copying"
and "show warranty" for details.
This GDB was configured as "--host=x86_64-apple-darwin13.3.0 --target=aarch64-linux-gnu".
Type "show configuration" for configuration details.
For bug reporting instructions, please see:
<http://www.gnu.org/software/gdb/bugs/>.
Find the GDB manual and other documentation resources online at:
<http://www.gnu.org/software/gdb/documentation/>.
For help, type "help".
Type "apropos word" to search for commands related to "word".

Now I had gdb working. Then I did started the debug by giving a “-s -S” while invoking qemu. After this, I need to connect to gdb remotely using

(gdb) target remote : 1234

Some of the debug information I received was this :

(gdb) target remote :1234
Remote debugging using :1234
0x0000000000000200 in ?? ()
(gdb) run
The “remote” target does not support “run”.  Try “help target” or “continue”.
(gdb) continue
Continuing.
^C
Program received signal SIGINT, Interrupt.
0x0000000000000200 in ?? ()

On trying single-step execution on gdb, I received :

(gdb) step
Cannot find bounds of current function
An error like this usually seen when we overflow a buffer and corrupt the stack, the proper return address is destroyed. When the debugger tries to figure out which function the address is in, it fails, because the address is not in any of the functions in the program.
On running the simple where on gdb I get [where displays the current line and function and the stack of calls that got you there]
(gdb) where
#0  0x0000000000000200 in ?? ()

After some unscrambling of the source code using information from gdb, we were pointed to some issues under the stage_entry in src/arch/arm64/stage_entry.S. I am onto re-setting those and continuing the debug further now.  


Update: coreboot conference in Europe, October 2015

UPDATE: Invitations published, venue is decided, few bed+breakfast rooms at the venue are still available

TL;DR: coreboot conference Oct 9-11, more info at http://coreboot.org/Coreboot_conference_Bonn_2015


Dear coreboot developers, users and interested parties,

we are currently trying to organize a coreboot conference and developer meeting in October 2015 in Germany.

This is not intended to be a pure developer meeting, we also hope to reach out to manufacturers of processors, chipsets, mainboards and servers/laptops/tablets/desktops with an interest in coreboot and the possibilities it offers.

My plan (which is not final yet) is to have the Federal Office for Information Security (BSI) in Germany host the conference in Bonn, Germany. As a national cyber security authority, the goal of the BSI is to promote IT security in Germany. For this reason, the BSI has funded coreboot development in the past for security reasons.

The preliminary plans are to coordinate the exact date of the conference to be before or after Embedded Linux Conference Europe, scheduled for October 5-7 in Dublin, Ireland. Planned duration is 3 days. This means we can either use the time window from Thursday Oct 1 to Sunday Oct 4, or from Thursday Oct 8 to Monday Oct 12. The former has the advantage of having cheaper hotel rooms available in Bonn, while the latter has the advantage of avoiding Oct 3, a national holiday in Germany (all shops closed). UPDATE: Preliminary dates are Friday Oct 9 to Sunday Oct 11. The doodle has been updated accordingly. Thursday and Monday could be filled with some cultural attractions if desired.

ATTENTION vendors/manufacturers: If your main interest is forging business relationships and/or strategic coordination and you want to skip the technical workshops and soldering, we’ll try make sure there is one outreach day of talks, presentations and discussions on a regular business day. Please indicate that with “(strategic)” next to your name in the doodle linked below.

If you wonder about how to reach Bonn, there are three options available by plane:
The closest is Cologne Airport (CGN), 30 minutes by bus to Bonn main station.
Next is Düsseldorf Airport (DUS), 1 hour by train to Bonn main station.
The airport with most international destinations is Frankfurt Airport (FRA), 2.5 hours by train to Bonn main station.
There’s the option to travel by train as well. Bonn is reachable by high-speed train (ICE), and other high-speed train stations are reasonably close (30 minutes).

What I’m looking for right now is a rough show of hands who’d like to attend so I can book a conference venue. I’d also like feedback on which weekend would be preferable for you. If you have any questions, please feel free to ask me directly <c-d.hailfinger.devel.2006@gmx.net> or our mailing list <coreboot@coreboot.org>.

Please enter your participation abilities in the doodle below:
http://doodle.com/bw52xs4fc7pxte6d

Regards,
Carl-Daniel Hailfinger

coreboot changelog – Week of 2015-07-20

This covers commits 406effd5 up to commit ef0158ec

Apart from adding the google/glados board, this week’s activity concentrated on bug fixes in chipsets and mainboards, spanning AMD K8 and Hudson, Intel Sandy Bridge, Braswell and Skylake, Nvidia Tegra, Rockchip RK3288 and RISC-V. Most of the changes are too small individually and too spread out across the code base for a shout-out (or this report becomes just a fancy kind of “git log”), but two changes stand out:

Native RAM init on Sandybridge gained support for multiple DIMMs on the same channel, further improving the reverse engineered code base for that chipset.

To improve Skylake support, our 8250mem serial port driver now also supports Skylake’s 32bit UART access mode. This may also be useful when reducing code duplication in our serial console drivers (such as on ARM SoCs).

[GSoC] EC/H8S firmware week #7|#8

Week #7 was is little bit frustrating, because of no real progress, only more unfinished things which aren’t working. Week #8 was a lot better.

1. Sniffing the communication between the 2 embedded controllers H8S and PMH4.

I’ve tried to build an protocol analyser with the msp430, but the data output was somehow strange. For testing purpose I used my H8S firmware to produce testing data. But the msp430 decoded only wrong data. I’m using IRQs on the clock to do the magic and writing it to a buffer before transmitting it via UART. Maybe the msp430 is too slow for that? Possible. Set a GPIO to high when the IRQ routing start and to low when it ends. Visualize the clock signal and connect the  IRQ measure pin to an oscilloscope. The msp430 is far too slow. I’m using memory dereference in the IRQ routine, which takes a lot of time. Maybe the msp430 is fast enough, when using asm routine and registers to buffer the 3 byte transmission. But a logic analyser would definitely work. So I borrowed two logic analyser. An OLS (Openbench Logic Sniffer) and a Saleae Logic16.

There isn’t so much data on the lines. Every 50 ms there is a short transmission of 3 byte. But I don’t want to decode the data by hand. So it needs a decoder for the logic analyser. sigrok looks like the best start point and both analyser are supported.

I’ve started with the Openbench Logic Sniffer, but unfortunately it doesn’t have enough RAM to buffer the input long enough. Maybe the external trigger input can be used. But before doing additional things I would like to test with the Logic16.

The Logic16 doesn’t support any triggers but it can stream all data over USB even with multiple MHz. Good enough to capture all data. I found out that the best samplerate is 2 MHz. Otherwise the LE signal isn’t captured, because it’s a lot shorter than a clock change. In the end I created a decoder with libsigrokdecode.

sigrok-cli -i boots_and_shutdown_later_because_too_hot.sr –channels 0-3 -P ec_xp:clk=2:data=3:le=1:oe=0 | uniq -c 

67 0x01 0x07 0xc8
3 0x01 0x04 0xc8 
4 0x01 0x10 0x48
1120 0x01 0x17 0x48
67 0x01 0x07 0xc8

0x01 0x07 0xc8 is called when only power is plugged in, like a watchdog(every 500ms)
0x01 0x17 0x48 is called when the device is powered on, like a watchdog (every 50ms)
0x01 0x04 0xc8 around the time power button pressed
0x01 0x10 0x48 around the time power button pressed

2. Flash back the OEM H8S firmare

The OEM H8S firmware is included in the bios updates. cabextract and strings is enough for extracting it out of the update. Look for SREC lines. Put the SREC lines into a separate file and flash them back via UART bootloader and the renesas flash tool. The display powers up and it’s booting again with OEM BIOS.
I could imagine they are using a similar update method like the UART bootloader. First transfer a flasher application into RAM and afterwards communicate with the flasher to transfer the new firmware, but the communication works over LPC instead of UART.

3. Progress on the bootloader

I’ve implemented the ADC converter to enable the speaker amp and the display backlight brightness.

Written down LPC registers and just enable the Interface in order to get GateA20 working. Still unclear how far this works.

4. How to break into the bootloader?

The idea of the bootloader is providing a brick free environment for further development. The bootloader loads the application which adds full support for everything. It should be possible to stop the loading application and flash a new application into the EC flash. When starting development on the x60 or x201 I want to use I2C line as debug interface. I2C chips have a big footstep and are easy to access. But there must be a way to abort the loading. I will use the function key in combination with the leds.

  1. Remove the battery and power plug.
  2. Press the function key
  3. Put the power plug in
  4. Wait until leds blinking
  5. release the function key within 5 seconds after the leds starting to blink to enter the bootloader.

The H8S will become I2C slave on a specific address.

What next?

  • Add new PMH4 commands to the H8S
  • solder additional pins to MAINOFF PWRSW_H8 A20 KBRC
  • use the logic analyser to put the communication in relation with these signals
  • UART shell
  • I2C master & client
  • solder LPC pins to analyse firmware update process
  • test T40 board with new PMH4 commands and look if all power rails are on

[GSoC] coreboot for ARM64 Qemu – Week #7

This was a tough week. After having passed the coreboot building stage, I thought my work would be easier now. But I had another thing coming.

As I had mentioned in my last post, I didn’t have any output while booting on qemu. So, the first aim was to get qemu monitor working. After some debug, I was able to get qemu monitor working to print onto my terminal (stdio)
This gave me then following :

qemu: fatal: Trying to execute code outside RAM or ROM at 0x0000000008000000

R00=00000950 R01=ffffffff R02=44000000 R03=00000000
R04=00000000 R05=00000000 R06=00000000 R07=00000000
R08=00000000 R09=00000000 R10=00000000 R11=00000000
R12=00000000 R13=00000000 R14=40010010 R15=08000000
PSR=400001db -Z– A und32
s00=00000000 s01=00000000 d00=0000000000000000
s02=00000000 s03=00000000 d01=0000000000000000
s04=00000000 s05=00000000 d02=0000000000000000
s06=00000000 s07=00000000 d03=0000000000000000
s08=00000000 s09=00000000 d04=0000000000000000
s10=00000000 s11=00000000 d05=0000000000000000
s12=00000000 s13=00000000 d06=0000000000000000
s14=00000000 s15=00000000 d07=0000000000000000
s16=00000000 s17=00000000 d08=0000000000000000
s18=00000000 s19=00000000 d09=0000000000000000
s20=00000000 s21=00000000 d10=0000000000000000
s22=00000000 s23=00000000 d11=0000000000000000
s24=00000000 s25=00000000 d12=0000000000000000
s26=00000000 s27=00000000 d13=0000000000000000
s28=00000000 s29=00000000 d14=0000000000000000
s30=00000000 s31=00000000 d15=0000000000000000
s32=00000000 s33=00000000 d16=0000000000000000
s34=00000000 s35=00000000 d17=0000000000000000
s36=00000000 s37=00000000 d18=0000000000000000
s38=00000000 s39=00000000 d19=0000000000000000
s40=000000 Abort trap: 6

I did some searching, this meant that the bootloader could not be loaded. And realised maybe the ROM qemu is being allotted is not sufficient. The ‘execute outside ram or rom’ is usually a jump to somewhere that qemu does not recognize as ROM/RAM.
Since we expect
CONFIG_BOOTBLOCK_BASE is 0x10000
CONFIG_ROMSTAGE_BASE  is 0x20000
CONFIG_SYS_SDRAM_BASE is 0x1000000
i.e ROM to start at 64k. So I ran qemu by giving a -m 2048M (for testing) and got over this fatal qemu error, but still wasn’t able to get coreboot to boot (no output on serial). This meant, some more debugging was needed.

I started to debug this using gdb. I created a gdb stub in the qemu boot (by using -s -S), but running gdb to connect to it gave me :
(gdb) target remote localhost:1234
Remote debugging using localhost:1234
warning: Architecture rejected target-supplied description
0x40080000 in ?? ()

Which probably meant I will have to have to build a cross gdb (aarch64-linux-gnu-gdb) and use that.
For this, on linux we could have something called gdb-multiarch, but this is not available for macOSX.

I then turned to using Valgrind. There are Valgrind tools available that can help detect many memory management bugs.

This is what I got on valgrind,

==2070== Memcheck, a memory error detector
==2070== Copyright (C) 2002-2013, and GNU GPL’d, by Julian Seward et al.
==2070== Using Valgrind-3.10.1 and LibVEX; rerun with -h for copyright info
==2070== Command: aarch64-softmmu/qemu-system-aarch64 -machine virt -cpu cortex-a57 -machine type=virt -nographic -m 2048 -kernel /Users/naman/gsoc/coreboot2.0/coreboot/build/coreboot.rom
==2070==
–2070– aarch64-softmmu/qemu-system-aarch64:
–2070– dSYM directory is missing; consider using –dsymutil=yes
UNKNOWN __pthread_sigmask is unsupported. This warning will not be repeated.
–2070– WARNING: unhandled syscall: unix:330
–2070– You may be able to write your own handler.
–2070– Read the file README_MISSING_SYSCALL_OR_IOCTL.
–2070– Nevertheless we consider this a bug.  Please report
–2070– it at http://valgrind.org/support/bug_reports.html.
==2070== Warning: set address range perms: large range [0x1053c5040, 0x1253c5040) (undefined)
==2070== Warning: set address range perms: large range [0x239e56040, 0x255e55cc0) (undefined)
==2070== Warning: set address range perms: large range [0x255e56000, 0x2d5e56000) (defined)

2070 set address range perms means that the permissions changed on a particularly large block of memory.
That can happen because when a very large memory allocation or deallocation occurs – a mmap or umap call. Which meant we are leaking some memory, but we need to find where. I read some documentations and believe something called a massif tool (in valgrind) could be used. I am now looking at how to find where this memory gets eaten.

On the target now is getting some answers on valgrind if possible. But if I dont get sufficient leads, I would have to switch to gdb (aarch64 on macOSX) and continue my debugging.