The coreboot firmware has just received a new patch adding Software Bill of Materials (SBoM). The SBoM concept has been mainly driven by Richard Hughes and has been derived from an executive order that has been issued last year by the US president. If you are more interested on the background of SBoM, Richard wrote a nice summary here.
Summarized, SBoM should provide a way to have a manifest of which parts have been built by whom and from where. The Bill of Materials(BoM) is a common term for hardware developers. It lists exactly what raw materials, sub-assemblies and parts including the quantities of each needed to actually manufacture the product. However, for software this is non-existent. On an operating system level one can sometimes choose on what should go on the disk and what not - for firmware this is not true. Firmware just ships with the hardware you bought - thus you have to live with it (There are exceptions - but in general..)
SBoM is here to change this and provides a list of used software parts that have been put together. Firmware consists of multiple parts, often lumped together as one binary. Even coreboot, as an open-source firmware projects, has to consume multiple closed-source binaries in order to work properly. Now the end user has an easy way to scroll through the SBoM and check in more detail what really is inside this binary blob called firmware.
How it works
Okay, let's look into more detail how this works in coreboot. Let's jump to the TL;DR first:
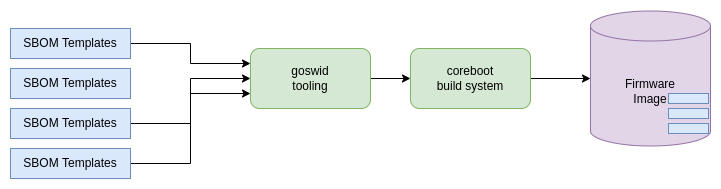
Figure 1: coreboot build process with SBOM
coreboot pulls in SBOM templates, modifies those that they fit for needs, and stich them into the image.
With the patchset that adds SBOM, we added three things to coreboot:
First of a set of SBOM templates,
Tooling that converts these SBOM templates into binary format,
Extend the coreboot build system to do all of this automatically while building coreboot.
SBOM Templates
We generated quite some templates for different parts within coreboot. First of all to give everyone a better kickstart in case they want to look at the SBOM files, and probably want to generate them on their own. So let's check how the process looks like if we enable SBOM in coreboot.
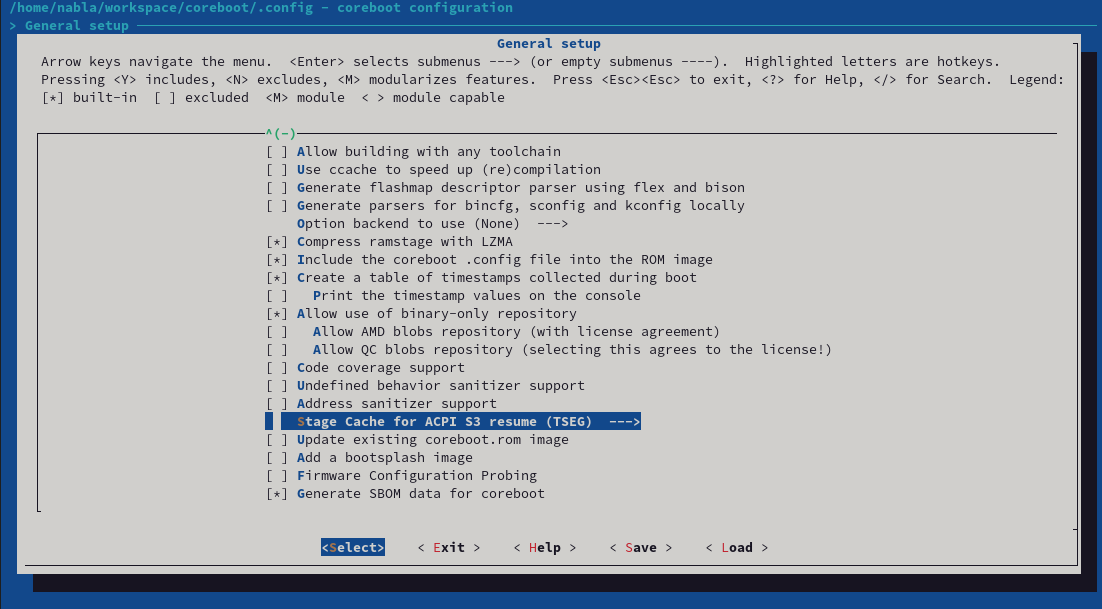
First of all, the provided patchset adds a new Kconfig to the General Setup menu.
Kconfig in coreboot
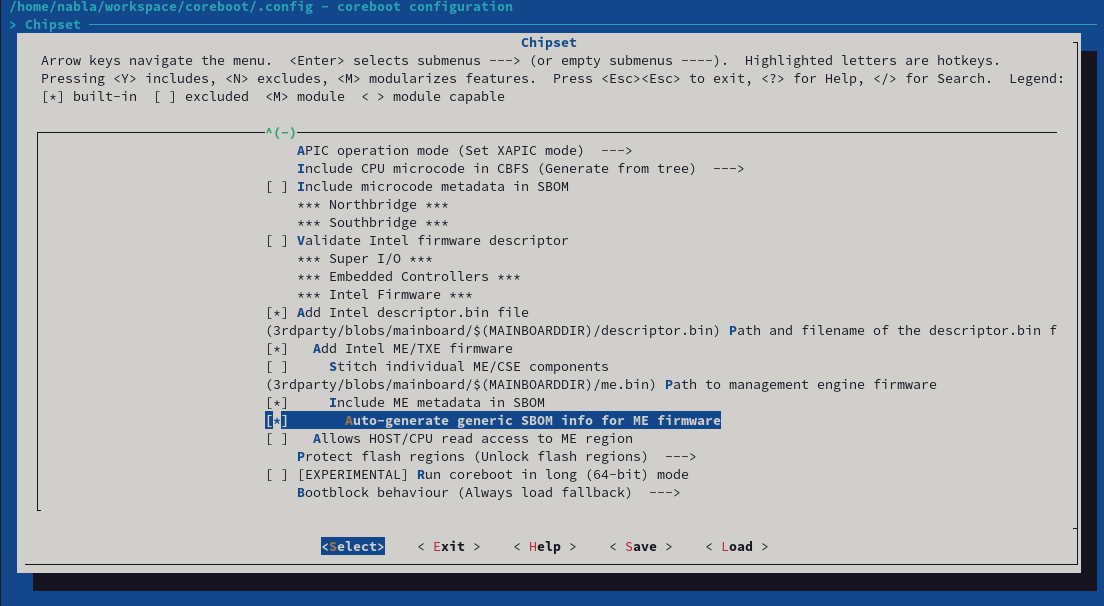
Once enabled, this will generate SBOM files for multiple other components like the Intel Management Engine, or all coreboot payloads like SeaBIOS. Every component gets it's own SBOM file - and can be enabled or disabled separately. For the Intel Management Engine, it looks like this:
Kconfig SBOM for Intel ME
If enabled, coreboot takes the provided templates in src/sbom and builds coSWID files out of this. To generate these files, we developed our own tooling called goSWID. The code can be found here, but it will also be checked into coreboot together with the patchset.
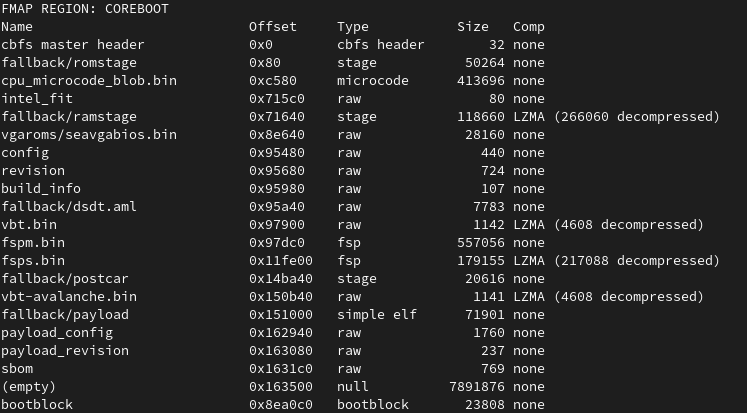
Within the build log from coreboot, we do see that we have our own sbom CBFS section now.
coreboot build output with SBOM
Details about what the SBOM CBFS section contains, can be printed by the goswid tooling.
goswid print
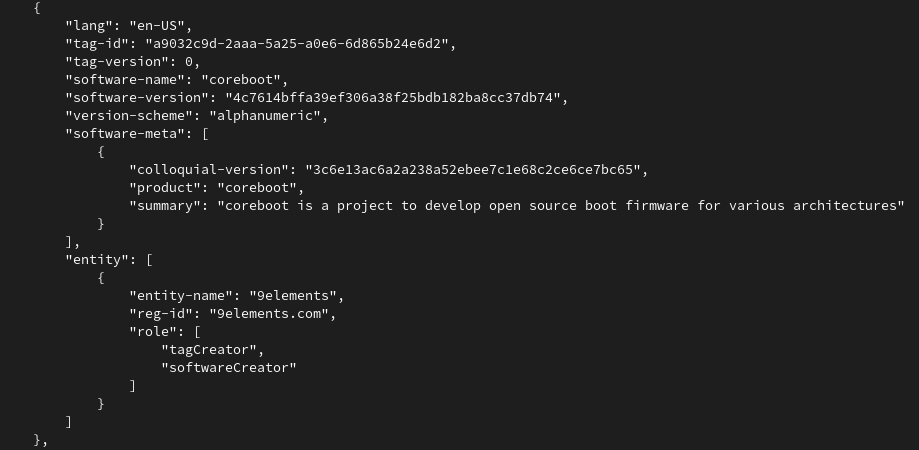
The tooling prints in JSON format what the sbom CBFS section contains. It gives you a list of all SBOM files, as shown here for the coreboot SBOM file. Overall the coreboot integration is already quite good - we will improve the experience over time now, however for us it was important to land the change first - and then keep working on the UX.
If you have any comments on these changes, feel free to drop us an e-mail.
Introduction If somebody would tell 7 years ago that Intel will support open source firmware, he would be laughed at instantly. If we recall time, like 15 years ago where the datasheets were more open and were sufficient to write open source firmware, today it is not possible. Silicon vendors are hiding the intellectual property contained in the processors. It would seem like the open source firmware is doomed, but…
I've been digging through the firmware for an AMD laptop with a Ryzen 6000 that incorporates Pluton for the past couple of weeks, and I've got some rough conclusions. Note that these are extremely preliminary and may not be accurate, but I'm going to try to encourage others to look into this in more detail. For those of you at home, I'm using an image from here, specifically version 309. The installer is happy to run under Wine, and if you tell it to "Extract" rather than "Install" it'll leave a file sitting in C:\\DRIVERS\ASUS_GA402RK_309_BIOS_Update_20220322235241 which seems to have an additional 2K of header on it. Strip that and you should have something approximating a flash image.
Looking for UTF16 strings in this reveals something interesting:
Pluton (HSP) X86 Firmware Support
Enable/Disable X86 firmware HSP related code path, including AGESA HSP module, SBIOS HSP related drivers.
Auto - Depends on PcdAmdHspCoreEnable build value
NOTE: PSP directory entry 0xB BIT36 have the highest priority.
NOTE: This option will NOT put HSP hardware in disable state, to disable HSP hardware, you need setup PSP directory entry 0xB, BIT36 to 1.
// EntryValue[36] = 0: Enable, HSP core is enabled.
// EntryValue[36] = 1: Disable, HSP core is disabled then PSP will gate the HSP clock, no further PSP to HSP commands. System will boot without HSP.
"HSP" here means "Hardware Security Processor" - a generic term that refers to Pluton in this case. This is a configuration setting that determines whether Pluton is "enabled" or not - my interpretation of this is that it doesn't directly influence Pluton, but disables all mechanisms that would allow the OS to communicate with it. In this scenario, Pluton has its firmware loaded and could conceivably be functional if the OS knew how to speak to it directly, but the firmware will never speak to it itself. I took a quick look at the Windows drivers for Pluton and it looks like they won't do anything unless the firmware wants to expose Pluton, so this should mean that Windows will do nothing.
So what about the reference to "PSP directory entry 0xB BIT36 have the highest priority"? The PSP is the AMD Platform Security Processor - it's an ARM core on the CPU package that boots before the x86. The PSP firmware lives in the same flash image as the x86 firmware, so the PSP looks for a header that points it towards the firmware it should execute. This gives a pointer to a "directory" - a list of different object types and where they're located in flash (there's a description of this for slightly older AMDs here). Type 0xb is treated slightly specially. Where most types contain the address of where the actual object is, type 0xb contains a 64-bit value that's interpreted as enabling or disabling various features - something AMD calls "soft fusing" (Intel have something similar that involves setting bits in the Firmware Interface Table). The PSP looks at the bits that are set here and alters its behaviour. If bit 36 is set, the PSP tells Pluton to turn itself off and will no longer send any commands to it.
So, we have two mechanisms to disable Pluton - the PSP can tell it to turn itself off, or the x86 firmware can simply never speak to it or admit that it exists. Both of these imply that Pluton has started executing before it's shut down, so it's reasonable to wonder whether it can still do stuff. In the image I'm looking at, there's a blob starting at 0x0069b610 that appears to be firmware for Pluton - it contains chunks that appear to be the reference TPM2 implementation, and it broadly decompiles as valid ARM code. It should be viable to figure out whether it can do anything in the face of being "disabled" via either of the above mechanisms.
Unfortunately for me, the system I'm looking at does set bit 36 in the 0xb entry - as a result, Pluton is disabled before x86 code starts running and I can't investigate further in any straightforward way. The implication that the user-controllable mechanism for disabling Pluton merely disables x86 communication with it rather than turning it off entirely is a little concerning, although (assuming Pluton is behaving as a TPM rather than having an enhanced set of capabilities) skipping any firmware communication means the OS has no way to know what happened before it started running even if it has a mechanism to communicate with Pluton without firmware assistance. In that scenario it'd be viable to write a bootloader shim that just faked up the firmware measurements before handing control to the OS.
The bit 36 disabling mechanism seems more solid? Again, it should be possible to analyse the Pluton firmware to determine whether it actually pays attention to a disable command being sent. But even if it chooses to ignore that, if the PSP is in a position to just cut the clock to Pluton, it's not going to be able to do a lot. At that point we're trusting AMD rather than trusting Microsoft, but given that you're also trusting AMD to execute the code you're giving them to execute, it's hard to avoid placing trust in them.
Overall: I'm reasonably confident that systems that ship with Pluton disabled via setting bit 36 in the soft fuses are going to disable it sufficiently hard that the OS can't do anything about it. Systems that give the user an option to enable or disable it are a little less clear in that respect, and it's possible (but not yet demonstrated) that an OS could communicate with Pluton anyway. However, if that's true, and if the firmware never communicates with Pluton itself, the user could install a stub loader in UEFI that mimicks the firmware behaviour and leaves the OS thinking everything was good when it absolutely is not.
So, assuming that Pluton in its current form on AMD has no capabilities outside those we know about, the disabling mechanisms are probably good enough. It's tough to make a firm statement on this before I have access to a system that doesn't just disable it immediately, so stay tuned for updates.
comments
Introduction Software testing is very important in every type of project to ensure the quality reaches the desired level and the product is in a production state. Unlike software testing, firmware testing does not only verify whether the code behaves as it is supposed to, but also covers functional verification if the hardware works as it should. It makes firmware validation much harder than any software application as we may face many unexpected and not always reproducible issues.
We have great news: The coreboot project has been accepted for this year’s Google Summer of Code! Thanks to everyone who made this possible!
You can find our GSoC organization page here [1] (unfortunately, newlines were removed from the description, but that’s true for all of the accepted orgs).
Looking at the GSoC timeline [2], this means the next step is discussing our exciting projects. We have about a month for this, from now until April 3rd, when the application phase starts.
We’re still looking for mentors! If you are interested, please have a look at the mail that Felix Singer, GSoC 2022 admin, sent earlier [3]. You also can help with code reviews or working out a project (writing description, defining project scope and tasks, …). Every bit of help counts.
For people interested in being GSoC candidates, we have set up a page [4] with all kinds of information and documentation. Please have a look at this, it’s really worth reading it 🙂
We have also prepared a list of projects [5] and started brainstorming more project ideas [6]. No matter whether you want to participate as a GSoC contributor or mentor, if you are interested, please let us know. Also, in case you have your own project idea, feel free to reach out.
We are excited to have great discussions with you!
P.S. The Flashrom project, which has been included as a part of coreboot in past GSoC programs has also been accepted as a separate GSoC 2022 participating organization. Congratulations!
coreboot 4.16 release
coreboot's first quarterly release in a number of years, version 4.16 was tagged on February 25th, 2022.
Since 4.15 there have been more than 1770 new commits by more than 170
developers. Of these, more than 35 contributed to coreboot for the
first time.
Welcome to the project!
Thank you to all the developers who continue to make coreboot the
great open source firmware project that it is.
New mainboards:
---------------
* Acer Aspire VN7-572G
* AMD Chausie
* ASROCK H77 Pro4-M
* ASUS P8Z77-M
* Emulation QEMU power9
* Google Agah
* Google Anahera4ES
* Google Banshee
* Google Beadrix
* Google Brya4ES
* Google Crota
* Google Dojo
* Google Gimble4ES
* Google Herobrine_Rev0
* Google Kingler
* Google Kinox
* Google Krabby
* Google Moli
* Google Nereid
* Google Nivviks
* Google Primus4ES
* Google Redrix4ES
* Google Skyrim
* Google Taeko4ES
* Google Taniks
* Google Vell
* Google Volmar
* Intel Alderlake-N RVP
* Prodrive Atlas
* Star Labs Star Labs StarBook Mk V (i3-1115G4 and i7-1165G7)
* System76 gaze16 3050
* System76 gaze16 3060
* System76 gaze16 3060-b
Removed mainboards:
-------------------
* Google -> Corsola
* Google -> Nasher
* Google -> Stryke
Added processors:
-----------------
* src/cpu/power9
* src/soc/amd/sabrina
Submodule Updates
-----------------
* /3rdparty/amd_blobs (6 commits)
* /3rdparty/arm-trusted-firmware (965 commits)
* /3rdparty/blobs (30 commits)
* /3rdparty/chromeec (2212 commits)
* /3rdparty/intel-microcode (1 commits)
* /3rdparty/qc_blobs (13 commits)
* /3rdparty/vboot (44 commits)
Plans to move platform support to a branch:
-------------------------------------------
After the 4.18 release in November 2022, we plan to move support for any
boards still requiring RESOURCE_ALLOCATOR_V3 to the 4.18 branch. V4 was
introduced more than a year ago and with minor changes most platforms
were able to work just fine with it. A major difference is that V3 uses
just one continuous region below 4G to allocate all PCI memory BAR's. V4
uses all available space below 4G and if asked to, also above 4G too.
This makes it important that SoC code properly reports all fixed
resources.
Currently only AGESA platforms have issues with it. On Gerrit both
attempts to fix AMD AGESA codebases to use V4 and compatibility modes
inside the V4 allocator have been proposed, but both efforts seem
stalled. See the (not yet merged) documentation
CB:43603 [1] on it's
details. It looks like properly reporting all fixed resources is the
issue.
At this point, we are not specifying which platforms this will include
as there are a number of patches to fix these issues in flight.
Hopefully, all platforms will end up being migrated to the v4 resource
allocator so that none of the platforms need to be supported on the
branch.
Additionally, even if the support for the platform is moved to a branch,
it can be brought back to ToT if they're fixed to support the v4
allocator.
Plans for Code Deprecation
--------------------------
As of release 4.18 (November 2022) we plan to deprecate LEGACY_SMP_INIT.
This also includes the codepath for SMM_ASEG. This code is used to start
APs and do some feature programming on each AP, but also set up SMM.
This has largely been superseded by PARALLEL_MP, which should be able to
cover all use cases of LEGACY_SMP_INIT, with little code changes. The
reason for deprecation is that having 2 codepaths to do the virtually
the same increases maintenance burden on the community a lot, while also
being rather confusing.
A few things are lacking in PARALLEL_MP init:
- Support for !CONFIG_SMP on single core systems. It's likely easy to
extend PARALLEL_MP or write some code that just does CPU detection on
the BSP CPU.
- Support SMM in the legacy ASEG (0xa0000 - 0xb0000) region. A POC
showed that it's not that hard to do with PARALLEL_MP CB:58700 [2]
No platforms in the tree have any hardware limitations that would block
migrating to PARALLEL_MP / a simple !CONFIG_SMP codebase.
Significant changes
-------------------
This is, of course, not a complete list of all changes in the 4.16
coreboot release, but a sampling of some of the more interesting and
significant changes.
### Option to disable Intel Management Engine
Disable the Intel (Converged Security) Management Engine ((CS)ME) via
HECI based on Intel Core processors from Skylake to Alder Lake. State is
set based on a CMOS value of `me_state`. A value of `0` will result in a
(CS)ME state of `0` (working) and value of `1` will result in a (CS)ME
state of `3` (disabled). For an example CMOS layout and more info, see
[cse.c](../../src/soc/intel/common/block/cse/cse.c).
### Add AMD apcb_v3_edit tool
apcb_v3_edit.py tool edits APCB V3 binaries. Specifically it will inject
up to 16 SPDs into an existing APCB. The APCB must have a magic number
at the top of each SPD slot.
### Allow enable/disable ME via CMOS
Add .enable method that will set the CSME state. The state is based on
the new CMOS option me_state, with values of 0 and 1. The method is very
stable when switching between different firmware platforms.
This method should not be used in combination with USE_ME_CLEANER.
State 1 will result in:
ME: Current Working State : 4
ME: Current Operation State : 1
ME: Current Operation Mode : 3
ME: Error Code : 2
State 0 will result in:
ME: Current Working State : 5
ME: Current Operation State : 1
ME: Current Operation Mode : 0
ME: Error Code : 0
### Move LAPIC configuration to MP init
Implementation for setup_lapic() did two things -- call enable_lapic()
and virtual_wire_mode_init().
In PARALLEL_MP case enable_lapic() was redundant as it was already
executed prior to initialize_cpu() call. For the !PARALLEL_MP case
enable_lapic() is added to AP CPUs.
### Add ANSI escape sequences for highlighting
Add ANSI escape sequences to highlight a log line based on its loglevel
to the output of "interactive" consoles that are meant to be displayed
on a terminal (e.g. UART). This should help make errors and warnings
stand out better among the usual spew of debug messages. For users whose
terminal or use case doesn't support these sequences for some reason (or
who simply don't like them), they can be disabled with a Kconfig.
While ANSI escape sequences can be used to add color, minicom (the
presumably most common terminal emulator for UART endpoints?) doesn't
support color output unless explicitly enabled (via -c command line
flag), and other terminal emulators may have similar restrictions, so in
an effort to make this as widely useful by default as possible I have
chosen not to use color codes and implement this highlighting via
bolding, underlining and inverting alone (which seem to go through in
all cases). If desired, support for separate color highlighting could be
added via Kconfig later.
### Add cbmem_dump_console
This function is similar to cbmem_dump_console_to_uart except it uses
the normally configured consoles. A console_paused flag was added to
prevent the cbmem console from writing to itself.
### Add coreboot-configurator
A simple GUI to change CMOS settings in coreboot's CBFS, via the
nvramtool utility. Testing on Debian, Ubuntu and Manjaro with coreboot
4.14+, but should work with any distribution or coreboot release that
has an option table. For more info, please check the
README [3].
### Update live ISO configs to NixOS 21.11
Update configs so that they work with NixOS 21.11. Drop `iasl` package
since it was replaced with `acpica-tools`.
### Move to U-Boot v2021.10
Move to building the latest U-Boot.
### Support systems with >128 cores
Each time the spinlock is acquired a byte is decreased and then the
sign of the byte is checked. If there are more than 128 cores the sign
check will overflow. An easy fix is to increase the word size of the
spinlock acquiring and releasing.
### Add [samsung] sx9360 [proximity sensor] driver
Add driver for setting up Semtech sx9360 SAR sensor.
The driver is based on sx9310.c. The core of the driver is the same, but
the bindings are slightly different.
Registers are documented in the kernel tree. [4]
Documentation/devicetree/bindings/iio/proximity/semtech,sx9360.yaml
### Add driver for Genesys Logic [SD Controller] GL9750
The device is a PCIe Gen1 to SD 3.0 card reader controller to be
used in the Chromebook. The datasheet name is GL9750S and the revision
is 01.
The patch disables ASPM L0s.
### Add support for Realtek RT8125
The Realtek RT8168 and RT8125 have a similar programming interface,
therefore add the PCI device ID for the RT8125 into driver for support.
### Add Fibocom 5G WWAN ACPI support
Support PXSX._RST and PXSX.MRST._RST for warm and cold reset.
PXSX._RST is invoked on driver removal.
build dependency:
soc/intel/common/block/pcie/rtd3
This driver will use the rtd3 methods for the same parent in the device
tree. The rtd3 chip needs to be added on the same root port in the
devicetree separately.
### Fix bug in vr_config
The `cpu_get_power_max()` function returns the TDP in milliwatts, but
the vr_config code interprets the value in watts. Divide the value by
1000 to fix this.
This also fixes an integer overflow when `cpu_get_power_max()` returns
a value greater than 65535 (UINT16_MAX).
### Make mixed topology work
When using a mixed memory topology with DDR4, it's not possible to boot
when no DIMMs are installed, even though memory-down is available. This
happens because the DIMM SPD length defaults to 256 when no DIMM SPD is
available. Relax the length check when no DIMMs are present to overcome
this problem.
### Add FSP 2.3 support
FSP 2.3 specification introduces following changes:
1. FSP_INFO_HEADER changes
Updated SpecVersion from 0x22 to 0x23
Updated HeaderRevision from 5 to 6
Added ExtendedImageRevision
FSP_INFO_HEADER length changed to 0x50
2. Added FSP_NON_VOLATILE_STORAGE_HOB2
Following changes are implemented in the patch to support FSP 2.3:
- Add Kconfig option
- Update FSP build binary version info based on ExtendedImageRevision
field in header
- New NV HOB related changes will be pushed as part of another patch
### Join hash calculation for verification and measurement
This patch moves the CBFS file measurement when CONFIG_TPM_MEASURED_BOOT
is enabled from the lookup step into the code where a file is actually
loaded or mapped from flash. This has the advantage that CBFS routines
which just look up a file to inspect its metadata (e.g. cbfs_get_size())
do not cause the file to be measured twice. It also removes the existing
inefficiency that files are loaded twice when measurement is enabled
(once to measure and then again when they are used). When CBFS
verification is enabled and uses the same hash algorithm as the TPM, we
are even able to only hash the file a single time and use the result for
both purposes.
### Skip FSP Notify APIs
Alder Lake SoC deselects Kconfigs as below:
- USE_FSP_NOTIFY_PHASE_READY_TO_BOOT
- USE_FSP_NOTIFY_PHASE_END_OF_FIRMWARE
to skip FSP notify APIs (Ready to boot and End of Firmware) and make
use of native coreboot driver to perform SoC recommended operations
prior booting to payload/OS.
Additionally, created a helper function `heci_finalize()` to keep HECI
related operations separated for easy guarding again config.
TODO: coreboot native implementation to skip FSP notify phase API (post
pci enumeration) is still WIP.
### Add support for PCIe Resizable BARs
Section 7.8.6 of the PCIe spec (rev 4) indicates that some devices can
indicates support for "Resizable BARs" via a PCIe extended capability.
When support this capability is indicated by the device, the size of
each BAR is determined in a different way than the normal "moving
bits" method. Instead, a pair of capability and control registers is
allocated in config space for each BAR, which can be used to both
indicate the different sizes the device is capable of supporting for
the BAR (powers-of-2 number of bits from 20 [1 MiB] to 63 [8 EiB]), and
to also inform the device of the size that the allocator actually
reserved for the MMIO range.
This patch adds a Kconfig for a mainboard to select if it knows that it
will have a device that requires this support during PCI enumeration.
If so, there is a corresponding Kconfig to indicate the maximum number
of bits of address space to hand out to devices this way (again, limited
by what devices can support and each individual system may want to
support, but just like above, this number can range from 20 to 63) If
the device can support more bits than this Kconfig, the resource request
is truncated to the number indicated by this Kconfig.
[1] https://review.coreboot.org/c/coreboot/+/43603
[2] https://review.coreboot.org/c/coreboot/+/58700
[3] https://web.archive.org/web/20220225194308/https://review.coreboot.org/plugins/gitiles/coreboot/+/refs/heads/master/util/coreboot-configurator/README.md
[4] https://web.archive.org/web/20220225182803/https://patchwork.kernel.org/project/linux-iio/patch/20211213024057.3824985-4-gwendal@chromium.org/coreboot 4.15 to 4.16 visualized
This post summarizes our current progress on making first coreboot port for POWER platform*, including Heads as a payload. It will also show how You can test it without having to actually flash firmware to PNOR permanently.
Description of OpenPOWER boot process and coreboot’s place in it can be found in previous post under OpenPOWER tag.
*) there is already a target for qemu-power8 that compiles successfully, but it executes just a single instruction: b .
Introduction Today’s computing systems and processors are becoming more and more efficient but closed as well. Closed in terms of documentation, closed in terms of free and open-source software and firmware. The x86 silicon vendors are striving for security by obscurity, falling deeper into the pit they created themselves, bound by laws that were supposed to protect them. As a result open-source firmware community has to struggle and push vendors into openness or to provide means to run open firmware on their products.
Librem 14s shipping today are already running the latest and greatest EC firmware. For those that already have their Librem 14, keeping your Librem EC firmware updated is simple with our ISO upgrade method. Still, for those needing to recover or test development EC builds, this video will explain how to upgrade your EC with a chip programmer. […]
The post Librem 14 EC Upgrade Hardware Method appeared first on Purism.
With the latest PureBoot R19 pre-release we have added a number of new changes including improved GUI workflows and new security features and published a ROM image so the wider community can test it before it turns into the next stable release. To test it, existing PureBoot users can download the R19-pre1 .rom file that […]
The post New PureBoot Feature: Scanning Root for Tampering appeared first on Purism.

 The coreboot firmware has just received a new patch adding Software Bill of Materials (SBoM). The SBoM concept has been mainly driven by Richard Hughes and has been derived from an executive order that has been issued last year by the US president. If you are more interested on the background of SBoM, Richard wrote a nice summary here.
Summarized, SBoM should provide a way to have a manifest of which parts have been built by whom and from where. The Bill of Materials(BoM) is a common term for hardware developers. It lists exactly what raw materials, sub-assemblies and parts including the quantities of each needed to actually manufacture the product. However, for software this is non-existent. On an operating system level one can sometimes choose on what should go on the disk and what not - for firmware this is not true. Firmware just ships with the hardware you bought - thus you have to live with it (There are exceptions - but in general..)
The coreboot firmware has just received a new patch adding Software Bill of Materials (SBoM). The SBoM concept has been mainly driven by Richard Hughes and has been derived from an executive order that has been issued last year by the US president. If you are more interested on the background of SBoM, Richard wrote a nice summary here.
Summarized, SBoM should provide a way to have a manifest of which parts have been built by whom and from where. The Bill of Materials(BoM) is a common term for hardware developers. It lists exactly what raw materials, sub-assemblies and parts including the quantities of each needed to actually manufacture the product. However, for software this is non-existent. On an operating system level one can sometimes choose on what should go on the disk and what not - for firmware this is not true. Firmware just ships with the hardware you bought - thus you have to live with it (There are exceptions - but in general..)