As you might know my GSoC project is about making a test rig that can make coreboot test systems more accessible to a coreboot test server. This test rig enables coreboot test server to interact with the systems under test (which may be remotely located) in the following ways:
- Power supply control (discussed in this post)
- power/reset switch control, voltage and temperature readouts, firmware flashing on serial flash (to be done next)
- provision for POST feedback (later)
With this project I’m hoping to create an environment where developers will be able to conveniently connect their systems to the coreboot test server for testing at their own place. This is why I like to call it a distributed test environment as it facilitates mass testing without the need to maintain a dedicated testing facility.
So this week I will present a nice and easy solution for power control of the coreboot test systems. I would call this device a ‘programmable power strip’. Before going to the final solution let me first walk you through all the routes that I’ve taken in order to answer some potential questions that may arise.
#1 Use of X10
X10 is an old and well known power line carrier communication protocol for DIY home automation. The problem with X10 is that it’s outdated and the official modules went away from the market. It is possible to learn from the existing designs and follow the official X10 specifications to make a new one but it didn’t seem to be worth the effort because the final product would be costly anyway for low volumes. The biggest drawback was that it is not cost effective if the no. of systems under test is less.
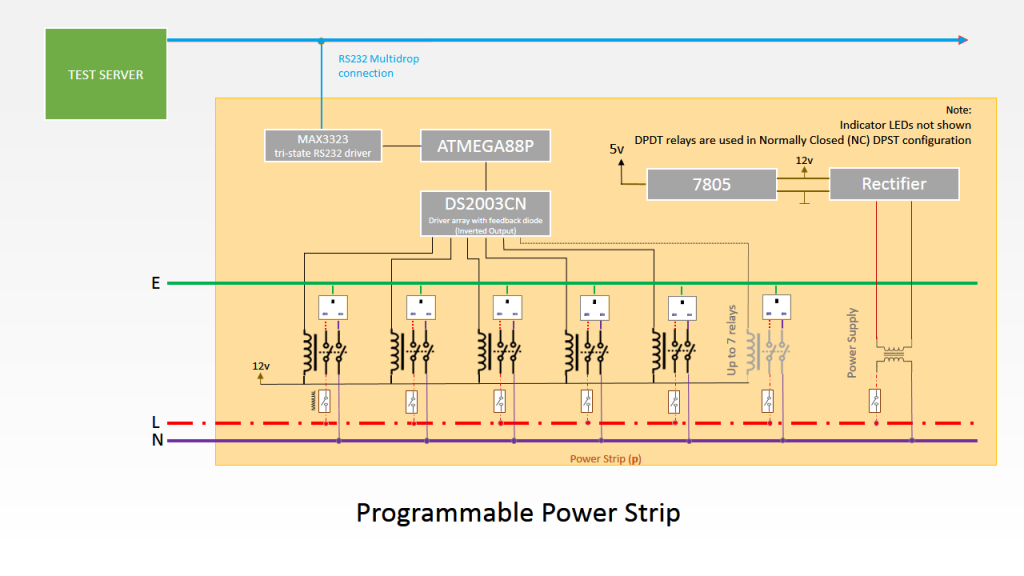
#2 µC controlled relay board using RS232/RS485 multidrop serial connection to the server with dedicated power supply
When thinking of this design I was in an impression that the length of the USB cables cannot be extended beyond 5m and so I thought of an alternative approach for connecting these programmable power strips to the test server across longer distances. We can use a modified version of RS-232 using MAX3323 tri-state transceivers to form a multi-drop connection. In a multi-drop connection there’s one master device (the computer) and a number of addressed slaves (the power strips). The slave talks to the master only if it is asked to, ensuring that one slave talks at a time. Later I changed the transceivers to RS-485 type which is also serial transmission standard but works in differential mode as compared to RS-232 which is single ended. This would enable me to use CAT-5 cables which are convenient to use. CAT-5 cables can be crimped easily and have a well-defined characteristic impedance for terminating the cables properly. The length of a cable could be up to few kilometers with this interface and if desired, a passive ethernet hub could be used to split connections. Multi-drop networks are also supported in the RS485 specification and hence no modification is required.
As I came to know that the length of USB cables can be increased upto 30m by cascading up to 5 USB hubs, I dropped this design and changed the interface to USB.
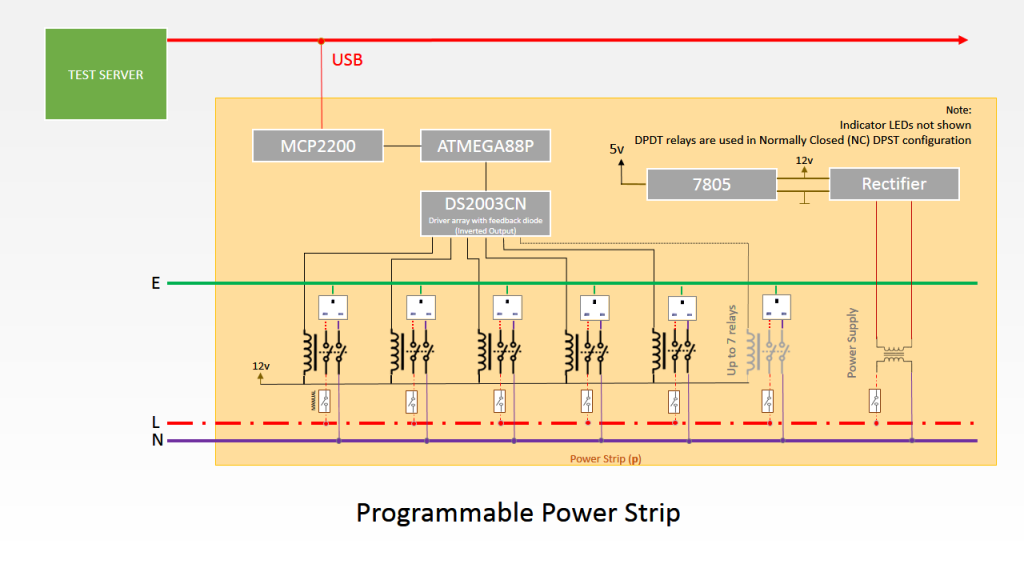
#3 Same board with USB interface using MCP2200
This time I used the MCP2200 USB to serial bridge to enable communication with the µC and it is inexpensive. It also has pre-programmed unique USB serial string to help us identify devices uniquely on a USB hub. USB serial strings are important in my project as they help to uniquely identify devices.
Now thinking of its implementation some issues regarding its safety and construction were raised. The most unsafe part in my opinion is the transformer used for driving the relay board. Transformers are mainly made up of metal and when there’s an overload or short circuit condition in the circuit or in the transformer itself, the transformer would keep on heating at a rate such that it transfers enough heat to the nearby material, raising its temperature to ignition point. This often goes undetected by the fuse because the fault current could be under the rated current for that transformer and the fuse doesn’t know whether the power is consumed by the load or whether it is being dissipated by the transformer. On the other hand consider a resistor or a transistor, since it doesn’t have the bulk to store heat its temperature quickly rises till the electrical connection breaks and this avoids heating of the nearby material to ignition temperature.
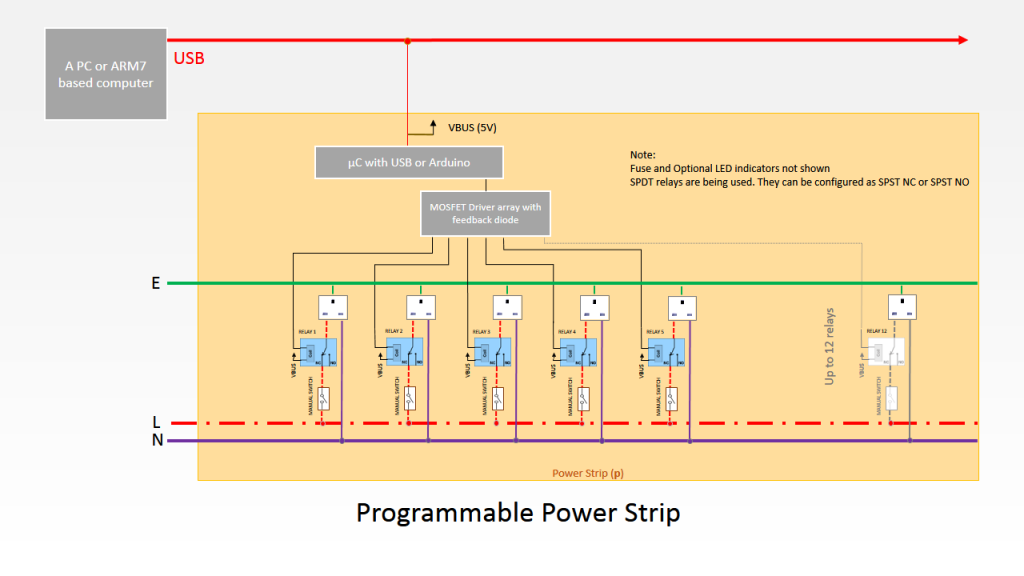
So I decided to remove the transformer and drive the circuit from USB bus power. Choosing appropriate low power relays was the next part.
#4 Bus powered USB power strip using 5V Sugar Cube relays (Finalized)
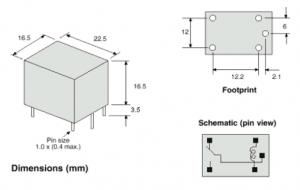
Choice of relays:
The relays I chose are very common and they are often called Sugar Cube relays in DIY community due to their appearance. They’re readily available in hobby electronic stores and they have right size, are of right type, have the right ratings and are the cheapest among all relays. Some appropriate part nos are JQC-3FC/T73 5VDC, OMRON G5LE-1 5VDC. These typically consume 72mA current to activate and considering 2mA per indicator LED and up to 10mA for the microcontroller (6x1mA for driving the base if BJT driver is used) the total power budget for 6 relay board is under 500mA, available with most USB ports.
So using the given relays up to 6 relays can be used. However this count can be increased by increasing the relay coil resistance by adding a series resistance (needs trial and error), or by choosing the sensitive versions of the relays (which are expensive of course). Therefore I’ve kept a provision of driving up to 12 relays in the microcontroller to give user some flexibility.
The contact ratings are 10A on 240/120V supply and this will be more than enough for controlling even a power hungry computer.
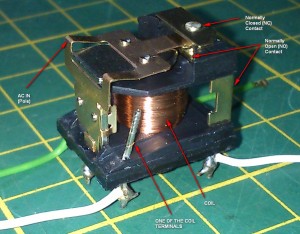
Here’s how the relay looks like:
I have taken apart a relay to show you that the DC coil, and the DC terminals are electrically isolated from the Mains supply. The datasheet states +/- 1500V dielectric strength between the contacts and the coil terminals. So unless you have 1500V coming on the mains you can stay assured that the high voltage side is isolated from the low voltage side. For a rare event of electrical surge due to a nearby lightening strike, a metal-oxide varistor (MOV) may be shunt-connected at the power inlet of the power strip to avoid voltages going beyond this limit in such a case.
Logic side:
I have removed MCP2200 bridge in this version. This is because the chip comes only in SMD packages and I wanted to offer two versions of the board: one that is SMD based and another that uses through-hole components. PIC18F14K50 is an attractive microcontroller for this purpose. It comes in a DIP-20 package as well as SOIC-20. It has inbuilt USB, 12 I/Os both analog and digital with a price of around 2 USD. I ordered this component but it hasn’t arrived yet. It’s probably stocked outside India and would take some time. For some reason this isn’t a popular chip because and it was not available at the local electronics market. So for now I would be using an Arduino UNO to implement this design. Arduinos are popular, abundant and their cheap clones are also widely available. A nice thing about the Arduino UNO is that it also comes with a preprogrammed unique USB serial string. 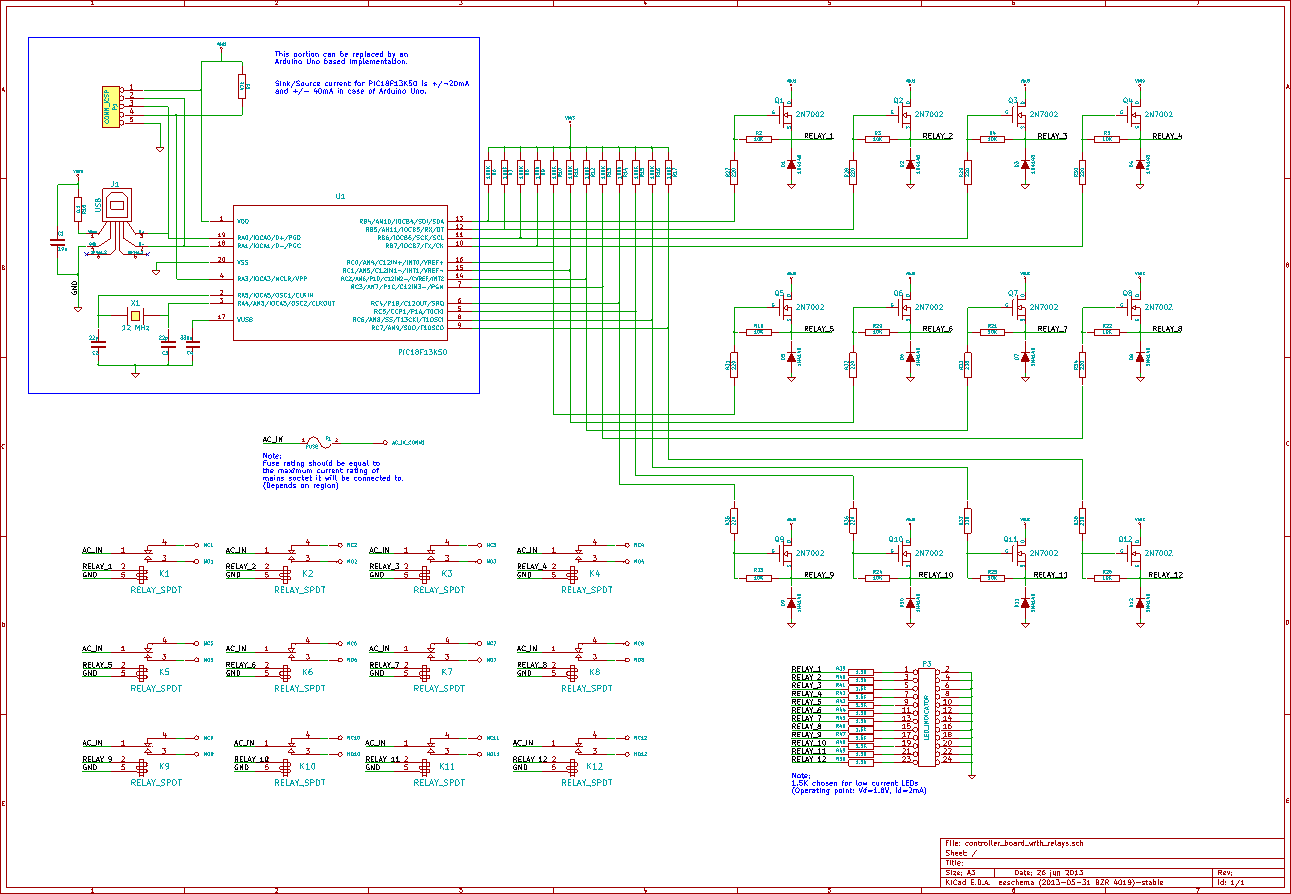
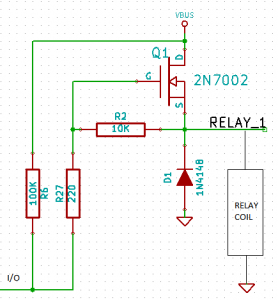
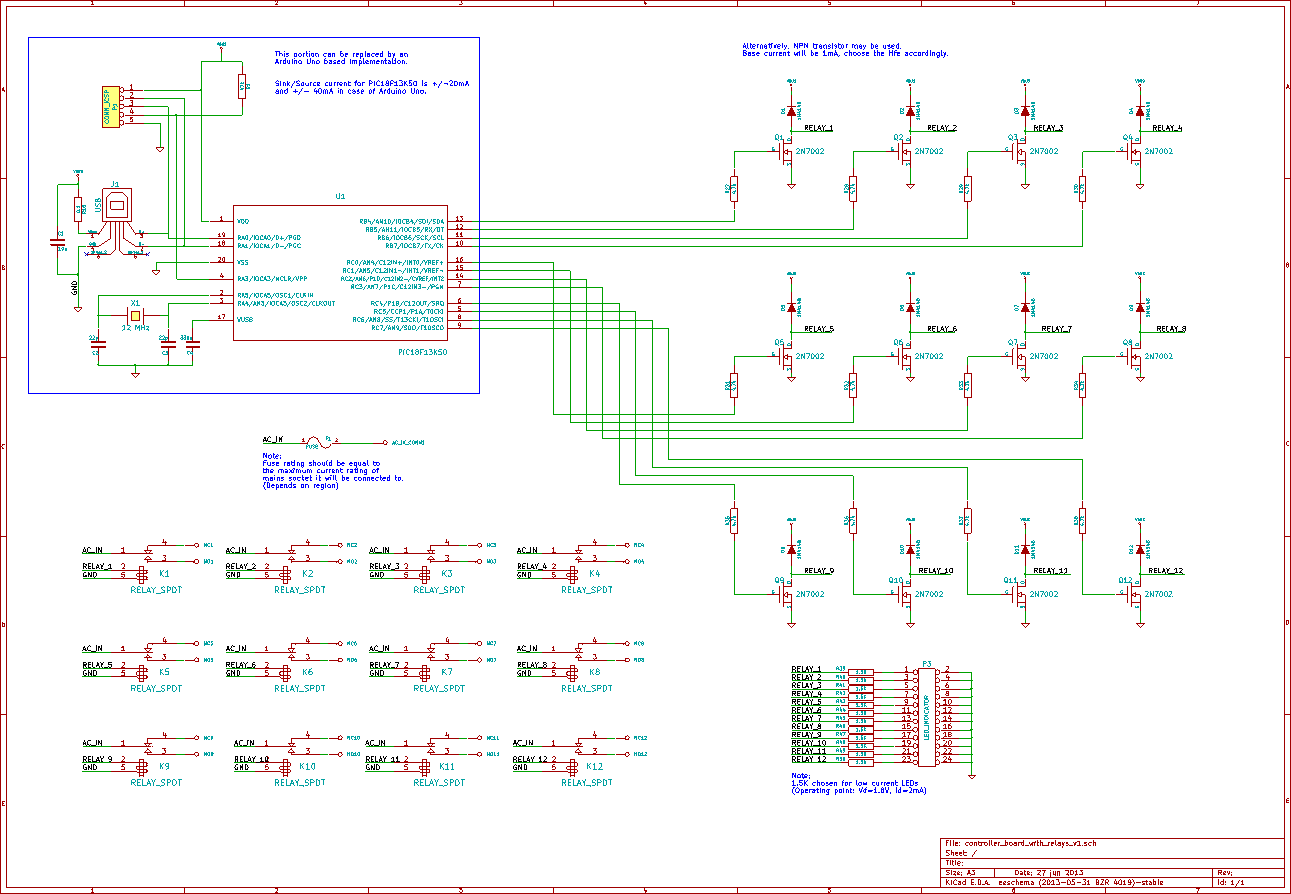
This is the schematic I made around the PIC microcontroller using KiCad. Notice that I chose a non-standard way to interface my relays with the microcontroller.
Here is an explanation for this interface:
Let’s consider that I’m initializing my microcontroller. I would first set the pin mode for the I/O to input and read its input. There are two pull resistors on the I/O line a weak 100k pull up (R6) and a strong 10k pull down (R2, in series with relay coil resistance) – that works only when a relay is present. Suppose the relay is present, then by voltage divider rule the voltage at I/O would be seen as nearly 0.5V and it would be read by the input as low. So the microcontroller would assume that the relay is present. After this the I/O pin mode would be set to output for normal operation. If the relay was not present during the initialization phase the pull-up resistor would have dominated and pulled the voltage of I/O line to 5V would have been read as high and an absent relay would have been assumed. Notice that R2 is also working as a gate discharge resistor. D1 is a feedback diode. The relay coil is inductive and whenever a current carrying inductor is disconnected it generates a very high voltage of opposite polarity in order to maintain its current. By connecting the feedback diode as shown, the diode gets forward biased and gives a low resistance path to the relay coil current.
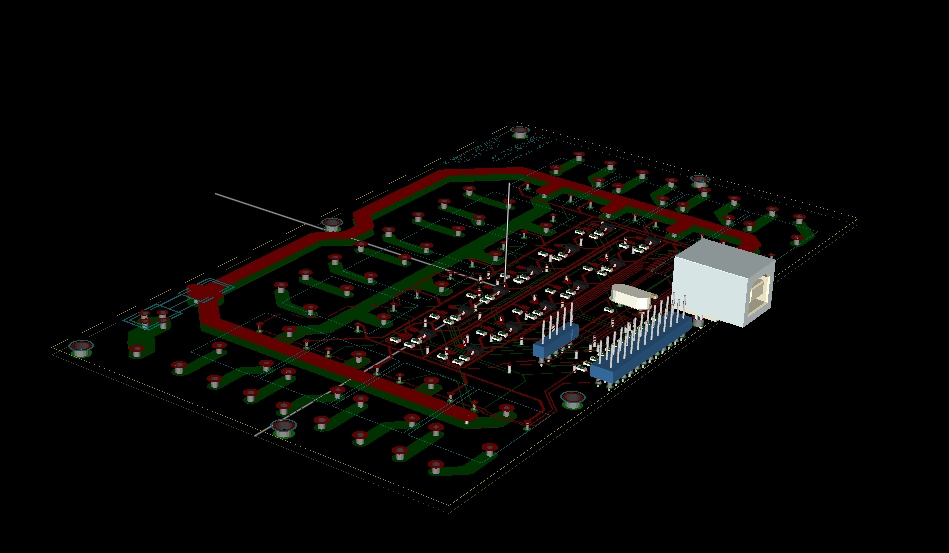
Such a relay detection scheme can help a lot in error handling by the microcontroller but since the part count would increase I would have to design an SMD board for it. So I got my hands dirty with KiCad for and I designed a nice PCB for it.
Notice that I’ve provided space for 12 relays if one would like to use the 40mA sensitive version of the relays.
I had to design many of the footprints since they were not available in the library or internet.
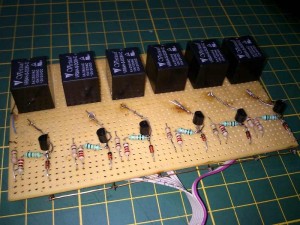
But wait, there is a BIG problem! I tried verifying my interface design by prototyping it:
And the relays did not turn on! I measured the voltage across the relay coil to be 2.37V when I gave high signal to the I/O line. So let’s go back to the interface schematic to see what was wrong.
I needed to think one step further. What if the relay turns on? As the current flows through the relay there is going to be some voltage drop across it, lifting the Vss to something greater than 0. As Vgs goes < Vth the transistor turns off. I believe this cycle continues till it reaches some point of equilibrum at 2.37V. I tried using a MOSFET of lower Vth and the voltage went to 3.7. I observed that the output voltage stays at Vdd-Vth.
Anyways I had to dump this idea as I couldn’t think of any other method to detect relay presence without using another transistor per relay.
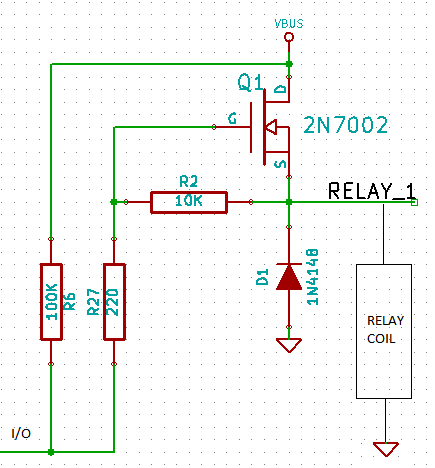
So here is the updated schematic:
This time I chose the usual straightforward interfacing. Notice that I chose a value of resistor that is appropriate for driving BJTs as well as MOSFETs so that one can use whichever is available. High gate resistance is usually not preferred in MOSFETs because of high RC time constant with the gate capacitance which affects the high frequency switching performance. Since high frequency is irrelevant here this value of resistance is acceptable.
There’s a feature called forward annotation in KiCAD and most EDA tools which helps to update only the relevant portions of the corresponding PCB design when the schematic is changed. So I updated netlist in the PCB file and the ratsnest was updated. I removed incorrect traces and footprints. I usually lay the important tracks manually and auto-route the others. Then give a final touching. This time the autorouting didn’t work. pcbNew crashes whenever I export my file to DSN format for autorouting. I spent entire day trying to fix the file but the problem didn’t go away. May be I’ll post my pcb file to the KiCad mailing list, so that they could help. For now it doesn’t matter because the design is has low part count after updating the schematic and may not need a PCB at all. One can build it on a perf-board and it’s even better if an Arduino is used. So let’s move on to prototyping.
The Prototype
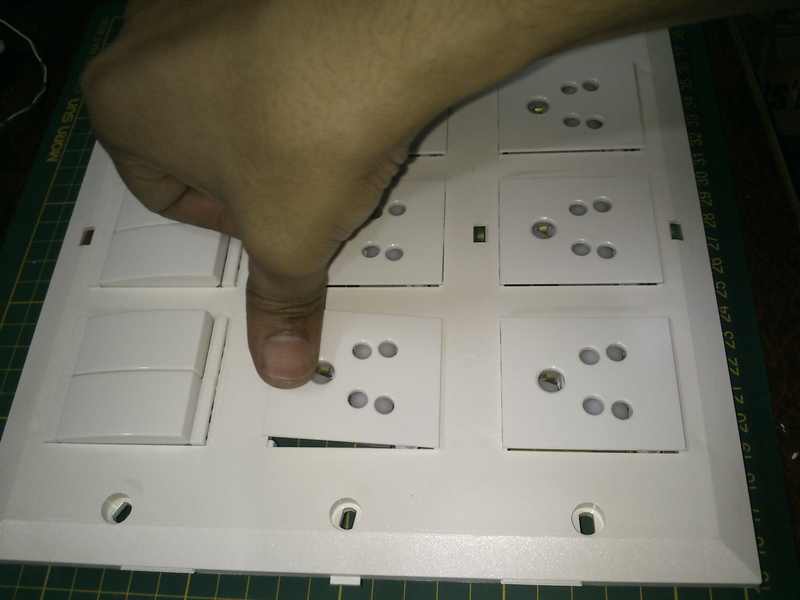
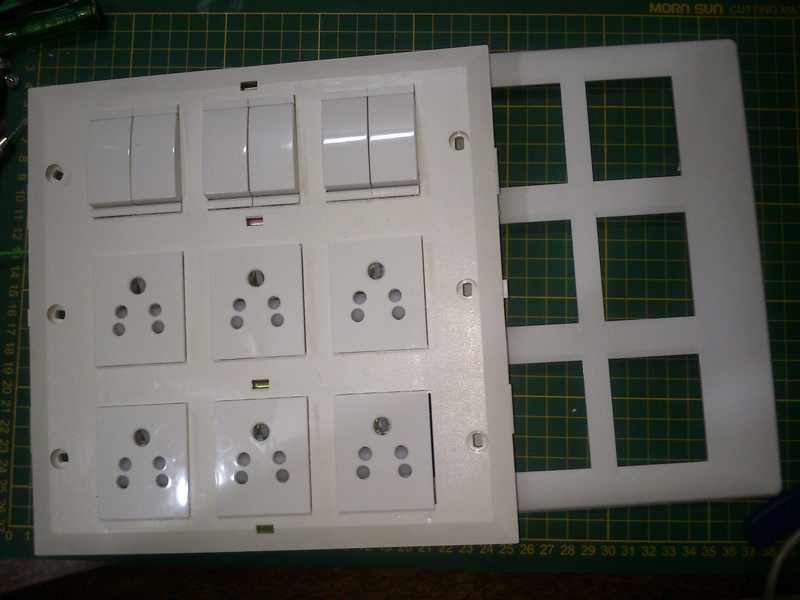
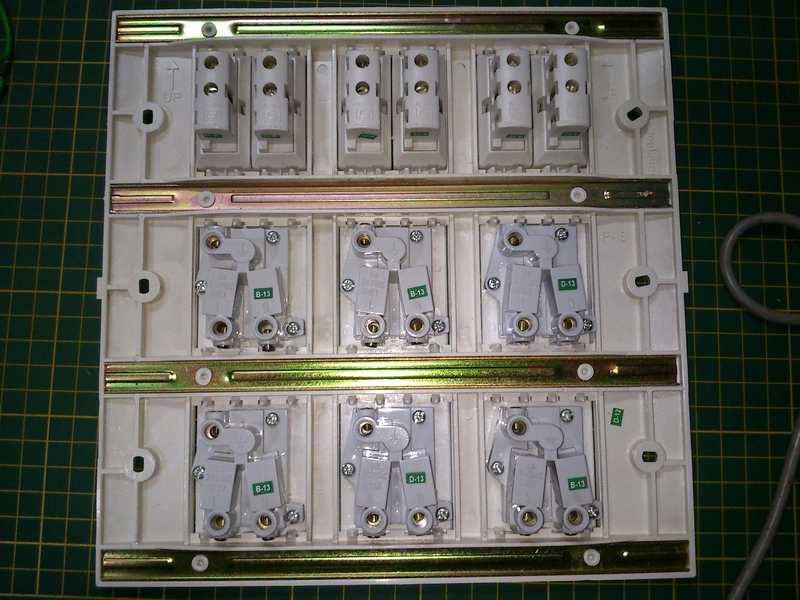
I will be using a standard modular wall switch plate and a wall mount PVC gang-box as shown above. These are basic electrical supplies and should be available at a nearby store. One has the flexibility of choosing the count of outlets and switches as per their needs.
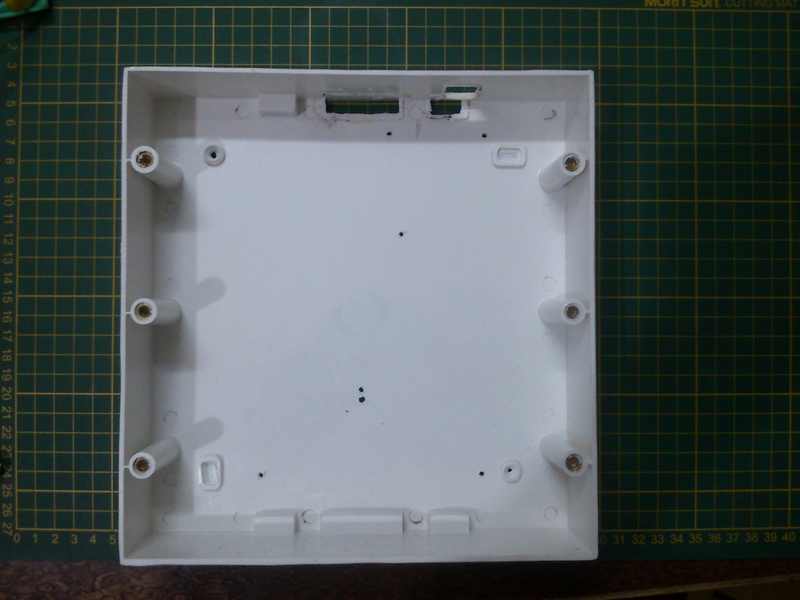
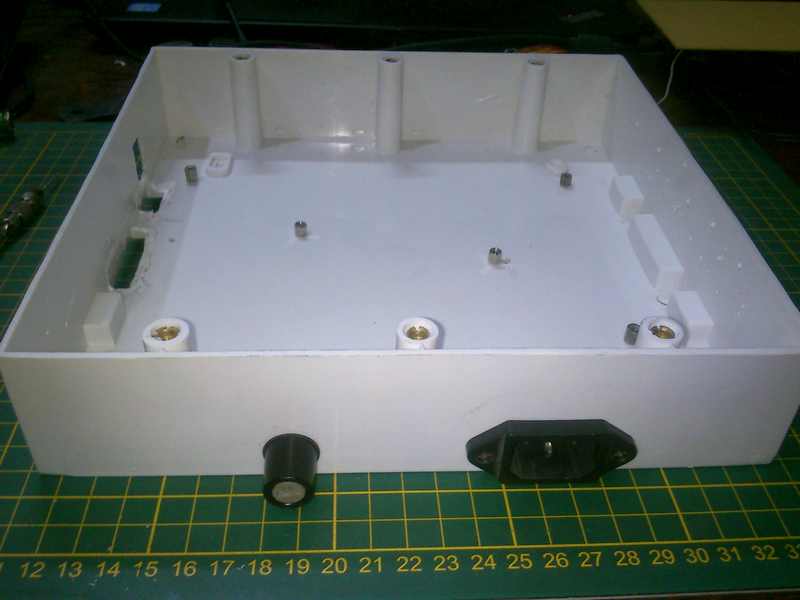
This is the PVC gang-box.
AN IMPORTANT NOTE: Choose gang-box and switch plates such that there’s enough space to fit the relay board inside. At least 2.1 cm clearance will be needed at some portion to fit the PCB if you are using the standard relays. Low height relays are also available which can make things easier. In my case clearance was enough.
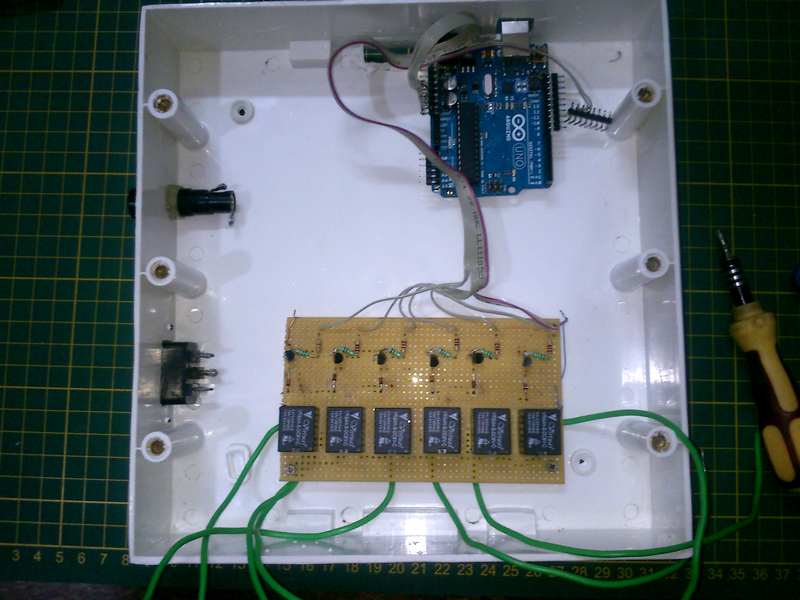
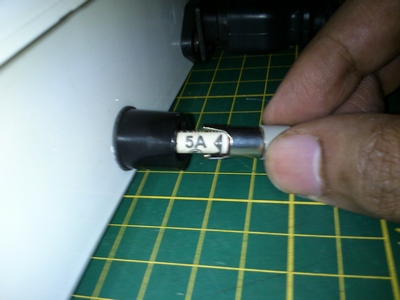
I prefer using motherboard standoffs for attaching the boards. The fuse holder and an IEC chassis mount power jack has also been attached at appropriate location.
This is how my boards look like. The relay board is really simple and it is made from the updated schematic. Since I’m using only the standard relays I will be using only 6 of them. The relay inputs go to pins 2 to 13 of the Arduino UNO on the digital I/O header. Note that pins 0 and 1 are not used as they are shared by the UART.
Every wire that is being soldered to the relay MUST be fastened securely to the board because the solder joint can break due to bad soldering or melt due to overheating in case of a cold solder joint. These wires must be stable in such conditions to ensure isolation between the HV and LV sides.
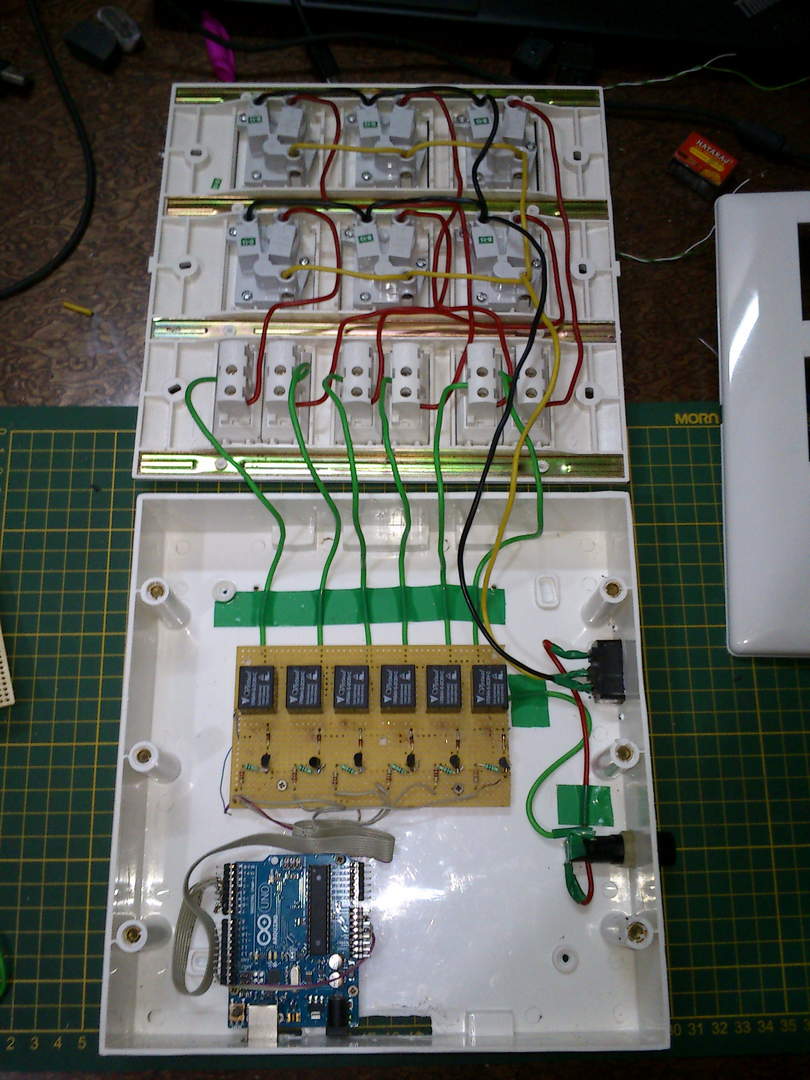
The boards were screwed to gang-box and the connections were double checked. It is important to put electrical tape on high voltage wires to secure them in place. Putting tape on any exposed high voltage carrying conductor is also a must for safety during debugging. I skipped the LED indicators to save some time.
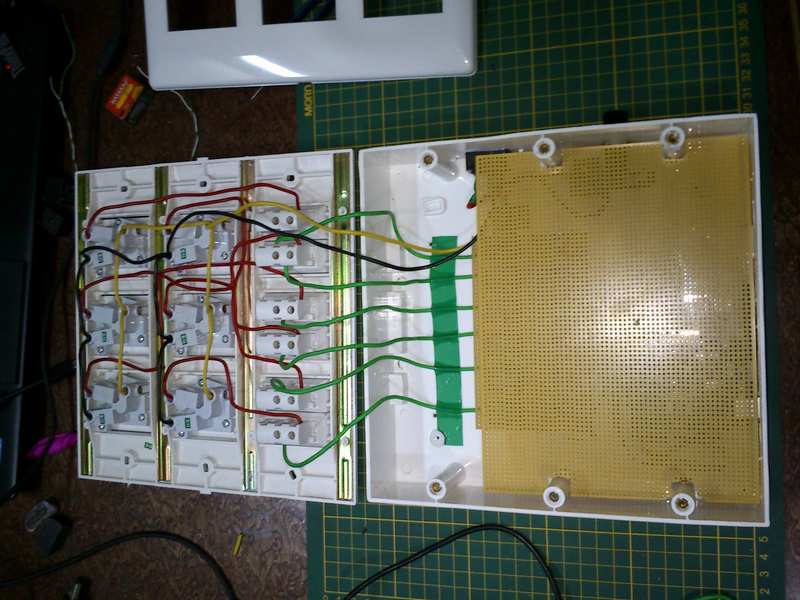
A mylar sheet or any sheet that is fire-resistant and provides good insulation should be used as a separator between the boards and the HV wires. I used what was lying around. A spare perf-board without copper traces should do just fine.
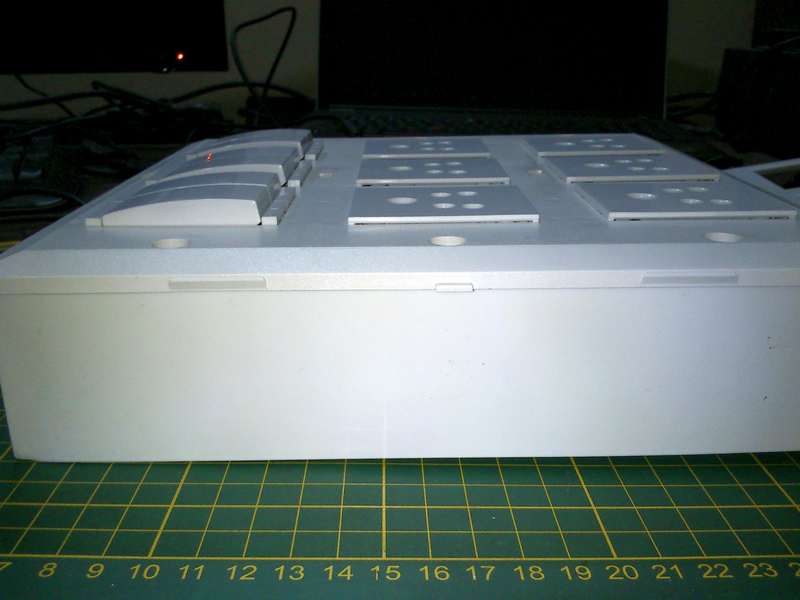
So the assembly is now complete.
Choice of correct fuse rating is critical. 10A for 120V outlet and 5A for 240V outlet is recommended. Using HRC (high rupture capacity) fuse provides better arc quenching for improved protection.
Firmware
So I was thinking about the behavior of the power strip and types of messages that I would be passing to it. The first thought was passing string messages like “power on r1”, “power off r2“, “power off all”, “reset” to control the relays. But this is arbitrary and I was thinking of some standard way of doing this. The answer is Modbus!
It is the de facto standard in automation industry for serial communication. It is robust, open and free to implement. In Modbus there’s one master and up to 247 slaves. This is like a multi-drop connection. The master sees each slave as a bunch of registers and bits. I would suggest watching this 9 minute video if you are unfamiliar with Modbus http://www.youtube.com/watch?v=OvRD2UvrHjE.
A nice thing about using this protocol on the power strip is that it can now be used with SCADA and HMI applications for home/building automation without any additional coding in the power strip.
For implementing a Modbus RTU slave (remote terminal unit) on the Arduino I used the Arduino-mobus-slave library by Jason Vreeland https://code.google.com/p/arduino-modbus-slave/.
So here’s the Arduino sketch: http://pastebin.com/s6ZXmgvG
In the modbus slave my switches appear to the Modbus master as coils addressed from 0 to 11. Note that the baudrate is 9600, 8 bits, No parity, 1 stop bit. I’m choosing 9600 to be safe, higher baud-rates may be used.
Modbus Master:
A Modbus master needs to be implemented on the computer side to interact with the power strip.
I found a nice python library for implementing Modbus master on the computer side. It’s ‘minimalmodbus’ https://pypi.python.org/pypi/MinimalModbus/
The following is the python script I used for controlling the power strip: http://pastebin.com/bEKTCTn6
I’ve testing this a number of times and its working reliably on Raspberry Pi as well.
A more useful script will be made later when I have a clearer idea of how it will interact with the test server.
Here’s a demonstration video: http://youtu.be/Fgaxu6fXLHQ
So why build a USB power strip?
I know there are some power strips available in market but they are quite few and they don’t give you the flexibility that this one gives.
Some specific problems:
- They may not have a good API for integration with the test server.
- No choice of no. of sockets and the quality of sockets.
- It may not have the type of sockets for your region.
- It may not be available in your country (customs duty cost added).
- It would cause problems if our test system is designed for a particular product and the seller no longer sells the product. An open source device like this one would avoid such a possibility.
- Market offerings that I’ve seen are definitely not SCADA/HMI compatible at this price point.
- Expensive!
And as far as the safety is concerned the actual construction is what determines the safety because the design is inherently safe IMHO.
So that’s all for now. This week I will be working on the flasher and controller board. Will appreciate your feed back on this one.
Thanks!



very thorough post, thanks for the interesting read! small notice regarding wordpress: there is a “more” tag () which can be used to split an introduction from the rest of a blog post so that only the introduction is shown on the main page of the blog. IMHO that would be a good idea for this entry.
thanks! 🙂 mails from coreboot blogs go straight to my spam folder so I didn’t get notified about this comment. That is a nice suggestion, I’ll use that tag from next time.