Hello everyone. The coding period for GSoC 2020 is now officially over and it’s time for the final evaluation. I’ll use this blog post to summarize the project details, illustrate the instructions to use ASan, and discuss some ideas on what can be done further to enhance this feature.
You can find the complete list of commits I made during GSoC with this Gerrit query.
Project details
Memory safety is hard to achieve. We, as humans, are bound to make mistakes in our code. While it may be straightforward to detect memory corruption bugs in few lines of code, it becomes quite challenging to find those bugs in a massive code. In such cases, ‘Address Sanitizer’ may prove to be useful and could help save time.
Address Sanitizer, also known as ASan, is a runtime memory debugger designed to find out-of-bounds accesses and use-after-scope bugs. Over the past couple of weeks, I’ve been working to add support for ASan to coreboot. You can read my previous blog posts (Part 1, Part 2, and Part 3) to see my progress throughout the summer.
Here is a description of the components included in the project:
GCC patch
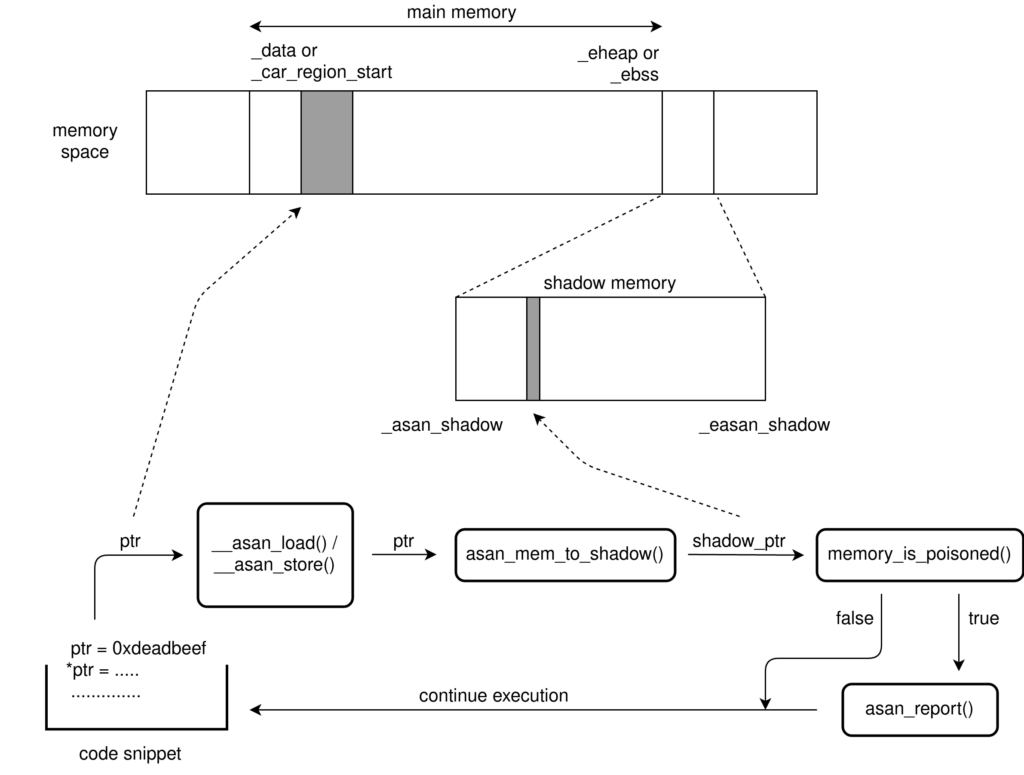
The design of ASan in coreboot is based on its implementation in Linux kernel, also known as Kernel Address Sanitizer (KASAN). However, we can’t directly port the code from Linux.
Unlike the Linux kernel which has a static shadow region layout, we have multiple stages in coreboot and thus require a different shadow offset address. Unfortunately, GCC currently only supports adding a static shadow offset at compile time using -fasan-shadow-offset flag. Therefore the foremost task was to add support for dynamic shadow offset to GCC.
We enabled GCC to determine the shadow offset address at runtime using a callback function named __asan_shadow_offset. This supersedes the need to specify this address at compile time. GCC then makes use of this shadow offset in its internal mem_to_shadow translation function to poison stack variables’ redzones.
The patch further allowed us to place the shadow region in a separate linker section. This ensured if a platform didn’t have enough memory space to hold the shadow buffer, the build would fail.
The way the patch was introduced to GCC’s code base ensures that if
one compiles a piece of code with the new switch enabled i.e. --param asan-use-shadow-offset-callback=1 but has not applied the patch itself to GCC, the compiler will throw the following error because the newly introduced switch is unknown for an out of box GCC: invalid --param name 'asan-use-shadow-offset-callback‘.
I believe this patch might also be useful to the developers who contribute to other open-source projects. Hence, I’ve put this patch on GCC’s mailing list and asked GCC’s developers to include this feature in their upcoming release.
ASan in ramstage
Since ramstage uses DRAM, regardless of the platform, it should always have enough room in the memory to hold the shadow buffer. Therefore, I began by adding support for ASan in ramstage on x86 architecture.
To reserve space in memory for the shadow region, I created a separate linker section and named it asan_shadow. Here, instead of allocating shadow memory for the whole memory region which includes drivers and hardware mapped addresses, I only defined shadow region for the data and heap sections.
Then I started porting KASAN library functions, tweaking them to make them suitable for coreboot.
The next task was to initialize the shadow memory at runtime. I created a function called asan_init which unpoisons i.e. sets the shadow memory corresponding to the addresses in the data and heap sections to zero.
In the case of global variables, instead of poisoning the redzones directly, the compiler inserts constructors invoking the library function named __asan_register_globals to populate the relevant shadow memory regions. So, I wrote a function named asan_ctors which calls these constructors at runtime and added a call to this function to asan_init().
After doing some tests, I realized that compiler’s ASan instrumentation cannot insert asan_load or asan_store state checks in the memory functions like memset, memmove and memcpy as they are written in assembly. So, I added manual checks using the library function named check_memory_region for both source and destination pointers.
ASan in romstage
Once I had ASan in ramstage working as expected, I started adding support for ASan to romstage.
It was challenging because of two reasons. First, even within the same architecture, the size of L1 cache varies across the platforms from 32KB in Braswell to 80KB in Ice Lake and thus we can’t enable ASan in romstage for all platforms by doing tests on a handful of devices. Second, the size of a cache is very small compared to RAM making it difficult to fit asan_shadow section in the limited memory.
Thankfully, the latter issue, to a large extent, was solved by our GCC patch which allowed us to append asan_shadow section to the region already occupied by the coreboot program and make efficient use of limited memory.
Now to resolve the first issue, I introduced a Kconfig option called HAVE_ASAN_IN_ROMSTAGE to denote if a particular platform supports ASan in romstage. This allowed us to enable ASan in romstage only for the platforms which have been tested.
Based on the hardware available with me and my mentor, I enabled ASan in romstage for Haswell and Apollo Lake platforms, apart from QEMU.
Project usage
Instructions for how to use ASan are included in ASan documentation. I’ll restate them with an example here.
Suppose there is a stack-out-of-bounds error in cbfs.c that we aren’t aware of. Let’s see if ASan can help us detect it.
int cbfs_boot_region_device(struct region_device *rdev)
{
	int stack_array[5], i;
	boot_device_init();

	for (i = 10; i > 0; i--)
		stack_array[i] = i;

	return vboot_locate_cbfs(rdev) &&
	       fmap_locate_area_as_rdev("COREBOOT", rdev);
}
First, we have to enable ASan from the configuration menu. Just select Address sanitizer support from General setup menu. Now, build coreboot and run the image.
ASan will report the following error in the console log:
ASan: stack-out-of-bounds in 0x7f7432fd
Write of 4 bytes at addr 0x7f7c2ac8
Here 0x7f7432fd is the address of the last good instruction before the bad access. In coreboot, stages are relocated. So, we have to normalize this address to find the instruction which causes this error.
For this, let’s subtract the start address of the stage i.e. 0x7f72c000. The difference we get is 0x000172fd. As per our console log, this error happened in the ramstage. So, let’s look at the sections headers of ramstage from ramstage.debug.
 $ objdump -h build/cbfs/fallback/ramstage.debug

build/cbfs/fallback/ramstage.debug:     file format elf32-i386

Sections:
Idx Name          Size      VMA       LMA       File off  Algn
  0 .text         00070b20  00e00000  00e00000  00001000  2**12
                  CONTENTS, ALLOC, LOAD, RELOC, READONLY, CODE
  1 .ctors        0000036c  00e70b20  00e70b20  00071b20  2**2
                  CONTENTS, ALLOC, LOAD, RELOC, DATA
  2 .data         0001c8f4  00e70e8c  00e70e8c  00071e8c  2**2
                  CONTENTS, ALLOC, LOAD, RELOC, DATA
  3 .bss          00012940  00e8d780  00e8d780  0008e780  2**7
                  ALLOC
  4 .heap         00004000  00ea00c0  00ea00c0  0008e780  2**0
                  ALLOC
Here the offset of the text segment is 0x00e00000. Let’s add this offset to the difference we calculated earlier. The resultant address is 0x00e172fd.
Next, we read the contents of the symbol table and search for a function having an address closest to 0x00e172fd.
 $ nm -n build/cbfs/fallback/ramstage.debug
........
........
00e17116 t _GLOBAL__sub_I_65535_1_gfx_get_init_done
00e17129 t tohex16
00e171db T cbfs_load_and_decompress
00e1729b T cbfs_boot_region_device
00e17387 T cbfs_boot_locate
00e1740d T cbfs_boot_map_with_leak
00e174ef T cbfs_boot_map_optionrom
........
The symbol having an address closest to 0x00e172fd is cbfs_boot_region_device and its address is 0x00e1729b. This is the function in which our memory bug is present.
Now, as we know the affected function, we read the assembly contents of cbfs_boot_region_device which is present in cbfs.o to find the faulty instruction.
 $ objdump -d build/ramstage/lib/cbfs.o
........
........
  51:   e8 fc ff ff ff          call   52 <cbfs_boot_region_device+0x52>
  56:   83 ec 0c                sub    $0xc,%esp
  59:   57                      push   %edi
  5a:   83 ef 04                sub    $0x4,%edi
  5d:   e8 fc ff ff ff          call   5e <cbfs_boot_region_device+0x5e>
  62:   83 c4 10                add    $0x10,%esp
  65:   89 5f 04                mov    %ebx,0x4(%edi)
  68:   4b                      dec    %ebx
  69:   75 eb                   jne    56 <cbfs_boot_region_device+0x56>
........
Let’s look for the last good instruction before the error happens. It would be the one present at the offset 62 (0x00e172fd – 0x00e1729b).
The instruction is add $0x10,%esp and it corresponds to for (i = 10; i > 0; i--) in our code. It means the very next instruction i.e. mov %ebx,0x4(%edi) is the one that causes the error. Now, if you look at C code of cbfs_boot_region_device() again, you’ll find that this instruction corresponds to stack_array[i] = i.
Voilà! we just caught the memory bug using ASan.
Future work
While my work for GSoC 2020 is complete, I think the following extensions would be useful for this project:
Heap buffer overflow
Presently, ASan doesn’t detect out-of-bounds accesses for the objects defined in heap. Fortunately, the support for these types of memory bugs can be added easily.
We just have to make sure that whenever some block of memory is allocated in the heap, the surrounding areas (redzones) are poisoned. Correspondingly, these redzones should be unpoisoned when the memory block is de-allocated.
Post-processing script
Unlike Linux, coreboot doesn’t have %pS printk format to dereference a pointer to its symbolic name. Therefore, we normalize the pointer address manually as I showed above to determine the name of the affected function and further use it to find the instruction which causes the error.
A custom script can be written to automate this process.
Support for other platforms and architectures
Jenkins builder built successfully for all x86 boards except for the ones that hold either Braswell SoC or i440bx northbridge where the cache area got full and thus couldn’t fit the asan_shadow section. It shows that support for ASan in romstage can be easily added to most x86 platforms. We just have to test them by selecting HAVE_ASAN_IN_ROMSTAGE option and resolve the compilation errors if any.
Enabling ASan in ramstage on other architectures like ARM or RISC-V should be easy too. We just have to make sure the shadow memory is initialized as early as possible when ramstage is loaded. This can be done by making a function call to asan_init() at the appropriate place.
Similarly, ASan in romstage can be enabled for other architectures. I have mentioned some key points in ASan documentation which could be used by someone who might be interested in doing so.
For the platforms that don’t have enough space in the cache to hold the asan_shadow section, we have to come up with a new translation function that uses a much compact shadow memory. Since the stack buffers are protected by the compiler, we’ll also have to create another GCC patch forcing it to use the new translation function for this particular platform.
Acknowledgement
I’d like to thank my mentor Werner Zeh for his continued assistance during the past 13 weeks. This project certainly wouldn’t have been possible without his valuable suggestions and the knowledge he shared. I’d also like to thank Patrick Georgi for helping me with the work authorization initially and later supervising my work during the time when Werner was on vacation.
Further, I am grateful to every member of the community for assisting me whenever I got stuck, reviewing my code, reading my blogs, and sharing their feedback.
It has been an amazing journey and I look forward to contributing to coreboot in the future.