
Hello again! Its been a month since my last blog post. So, there are many updates I’d like to share. I’ll first cover the Address Sanitizer (ASan) algorithm in detail and then summarize the progress made until the second evaluation period.
If you recall my last post, I had briefly talked about the principle behind ASan. Now, let us discuss the ASan algorithm in much more depth. But first, we need to understand the memory layout and how the compiler’s instrumentation works.
Memory mapping
ASan divides the memory space into 2 disjoint classes:
- Main Memory (mem): This represents the original memory used by our coreboot program in a particular stage.
- Shadow Memory (shadow): This memory region contains the shadow values. The state of each 8 aligned bytes of mem is encoded in a byte in shadow. As a consequence, the size of this region is equal to 1/8th of the size of mem. To reserve a space in memory for this class, we added a new linker section and named it
asan_shadow.
This is how we added asan_shadow in romstage:
#if ENV_ROMSTAGE && CONFIG(ASAN_IN_ROMSTAGE)
	_shadow_size = (_ebss - _car_region_start) >>  3;
	REGION(asan_shadow, ., _shadow_size, ARCH_POINTER_ALIGN_SIZE)
#endif
and in ramstage:
#if ENV_RAMSTAGE && CONFIG(ASAN_IN_RAMSTAGE)
	_shadow_size = (_eheap - _data) >> 3;
	REGION(asan_shadow, ., _shadow_size, ARCH_POINTER_ALIGN_SIZE)
#endif
The linker symbol pairs (_car_region_start, _ebss) and ( _data, _eheap) are references to the boundary addresses of mem in romstage and ramstage respectively.
Now, there exists a correspondence between mem and shadow classes and we have a function named asan_mem_to_shadow that performs this translation:
void *asan_mem_to_shadow(const void *addr)
{
#if ENV_ROMSTAGE
	return (void *)((uintptr_t)&_asan_shadow + (((uintptr_t)addr -
		(uintptr_t)&_car_region_start) >> ASAN_SHADOW_SCALE_SHIFT));
#elif ENV_RAMSTAGE
	return (void *)((uintptr_t)&_asan_shadow + (((uintptr_t)addr -
		(uintptr_t)&_data) >> ASAN_SHADOW_SCALE_SHIFT));
#endif
}
In other words, asan_mem_to_shadow maps each 8 bytes of mem to 1 byte of shadow.
You may wonder what is stored in shadow? Well, there are only 9 possible shadow values for any aligned 8 bytes of mem:
- The shadow value is 0 if all 8 bytes in qword are unpoisoned (i.e. addressable).
- The shadow value is negative if all 8 bytes in qword are poisoned (i.e. not addressable).
- The shadow value is k if the first k bytes are unpoisoned but the rest 8-k bytes are poisoned. Here k could be any integer between 1 and 7 (1 <= k <= 7).
When we say a byte in mem is poisoned, we mean one of these special values are written into the corresponding shadow.
Instrumentation
Compiler’s ASan instrumentation adds a runtime check to every memory instruction in our program i.e. before each memory access of size 1, 2, 4, 8, or 16, a function call to either __asan_load(addr) or __asan_store(addr) is added.
Next, it protects stack variables by inserting gaps around them called ‘redzones’. Let’s look at an example:
int foo ()
{
char a[24] = {0};
int b[2] = {0};
int i;

a[5] = 1;

for (i = 0; i < 10; i++)
    b[i] = i;

return a[5] + b[1];
}
For this function, the instrumented code will look as follows:
int foo ()
{
char redzone1[32]; // Slot 1, 32-byte aligned
char redzone2[8];  // Slot 2
char a[24] = {0};  // Slot 3
char redzone3[32]; // Slot 4, 32-byte aligned
int redzone4[6];   // Slot 5
int b[2] = {0};    // Slot 6
int redzone5[8];   // Slot 7, 32-byte aligned
int redzone6[7];
int i;
int redzone7[8];

__asan_store1(&a[5]);
a[5] = 1;

for (i = 0; i < 10; i++)
    __asan_store4(&b[i]);
    b[i] = i;

__asan_load1(&a[5]);
__asan_load4(&b[1]);
return a[5] + b[1];
}
As you can see, the compiler has inserted redzones to pad each stack variable. Also, it has inserted function calls to __asan_store and __asan_load before writes and reads respectively.
The shadow memory for this stack layout is going to look like this:
Slot 1:        0xF1F1F1F1
Slots 2, 3:    0xF1000000
Slot 4:        0xF1F1F1F1
Slots 5, 6:    0xF1F1F100
Slot 7:        0xF1F1F1F1
Here F1 being a negative value represents that all 8 bytes in qword are poisoned whereas the shadow value of 0 represents that all 8 bytes in qword are accessible. Notice that in the slots 2 and 3, the variable ‘a’ is concatenated with a partial redzone of 8 bytes to make it 32 bytes aligned. Similarly, a partial redzone of 24 bytes is added to pad the variable ‘b’.
The process of protecting global variables is a little different from this. We’ll talk about it later in this blog post.
Now, as we have looked at the memory mapping and the instrumented code, let’s dive into the algorithm.
ASan algorithm
The algorithm is pretty simple. For every read and write operation, we do the following:
- First, we find the address of the corresponding shadow memory for the location we are writing to or reading from. This is done by
asan_mem_to_shadow(). - Then we determine if the access is valid based on the state stored in the shadow memory and the size requested. For this, we pass the address returned from
asan_mem_to_shadow()tomemory_is_poisoned(). This function dereferences the shadow pointer to check the memory state. - If the access is not valid, it reports an error in the console mentioning the instruction pointer address, the address where the bug was found, and whether it was read or write. In our ASan library, we have a dedicated function
asan_report()for this. - Finally, we perform the operation (read or write).
- Then, we continue and move over to the next instruction.
Here’s a pictorial representation of the algorithm:
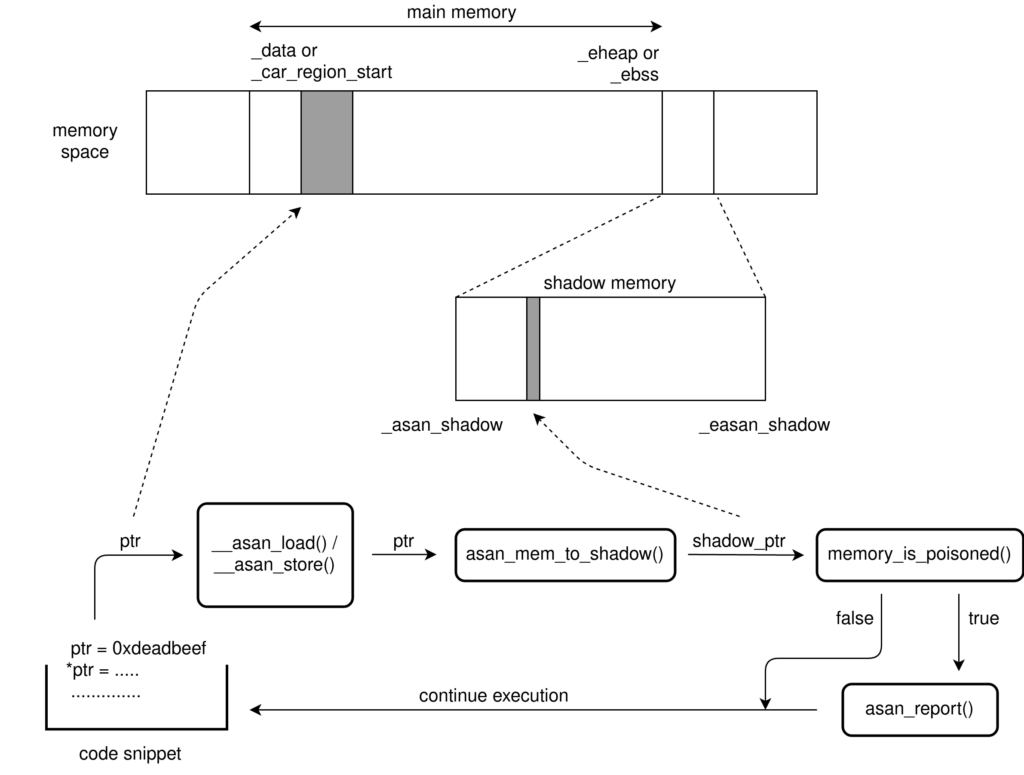
Note that whether access is valid or not, ASan never aborts the current operation. However, the calls to ASan functions do add a performance penalty of about ~1.5x.
Now, as we have understood the algorithm, let’s look at the function foo() again.
int foo ()
{
char a[24] = {0};
int b[2] = {0};
int i;

__asan_store1(&a[5]);
a[5] = 1;

for (i = 0; i < 10; i++)
    __asan_store4(&b[i]);
    b[i] = i;

__asan_load1(&a[5]);
__asan_load4(&b[1]);
return a[5] + b[1];
}
Have a look at the for loop. The array ‘b’ is of length 2 but we are writing to it even beyond index 1.
As the loop is executed for index 2, ASan checks the state of the corresponding shadow memory for &b[2]. Now, let’s look at the shadow memory state for slot 7 again (shown in the previous section). It is 0xF1F1F1F1. So, the shadow value for the location b[2] is F1. It means the address we are trying to access is poisoned and thus ASan is triggered and reports the following error in the console log:
ASan: stack-out-of-bounds in 0x07f7ccb1
Write of 4 bytes at addr 0x07fc8e48
Notice that 0x07f7ccb1 is the address where the instruction pointer was pointing to and 0x07fc8e48 is the address of the location b[2].
ASan support for romstage
In the romstage, coreboot uses cache to act as a memory for our stack and heap. This poses a challenge when adding support for ASan to romstage because of two reasons.
First, even within the same architecture, the size of cache varies across the platforms. So, unlike ramstage, we can’t enable ASan in romstage for all platforms by doing tests on a handful of devices. We have to test ASan on each platform before adding this feature. So, we decided to introduce a new Kconfig option HAVE_ASAN_IN_ROMSTAGE to denote if a particular platform supports ASan in romstage. Now, for each platform for which ASan in romstage has been tested, we’ll just select this config option. Similarly, we also introduced HAVE_ASAN_IN_RAMSTAGE to denote if a given platform supports ASan in ramstage.
The second reason is that the size of a cache is very small compared to the RAM. This is critical because the available memory in the cache is quite low. In order to fit the asan_shadow section on as many platforms as possible, we have to make efficient use of the limited memory available. Thankfully, to a large extent, this problem was solved by our GCC patch which allowed us to append the shadow memory buffer to the region already occupied by the coreboot program. (I ran Jenkins builder and it built successfully for all boards except for the ones that hold either Braswell SoC or i440bx northbridge where the cache area got full and thus couldn’t fit the asan_shadow section.)
In the first stage, we have enabled ASan in romstage for QEMU, Haswell and Apollolake platforms as they have been tested.
Further, the results of Jenkins builder indicate that, with the current translation function, the support for ASan in romstage can be added on all x86 platforms except the two mentioned above. Therefore, I’ve asked everyone in the community to participate in the testing of ASan so that this debugging tool can be made available on as many platforms as possible before GSoC ends.
Global variables
When we initially added support for ASan in ramstage, it wasn’t able to detect out-of-bounds bugs in case of global variables. After debugging the code, I found that the redzones for the global variables were not poisoned. So, I went through GCC’s ASan and Linux’s KASAN implementation again and realized that the way in which the compiler protects global variables was very much different from its instrumentation for stack variables.
Instead of padding the global variables directly with redzones, it inserts constructors invoking the library function named __asan_register_globals to populate the relevant shadow memory regions. To this function, compiler also passes an instance of the following type:
struct asan_global {
       /* Address of the beginning of the global variable. */
       const void *beg;

       /* Initial size of the global variable. */
       size_t size;

       /* Size of the global variable + size of the red zone. This
          size is 32 bytes aligned. */
       size_t size_with_redzone;

       /* Name of the global variable. */
       const void *name;

       /* Name of the module where the global variable is declared. */
       const void *module_name;

       /* A pointer to struct that contains source location, could be NULL. */
       struct asan_source_location *location;
     }
So, to enable the poisoning of global variables’ redzones, I created a function named asan_ctors which calls these constructors at runtime and added it to ASan initialization code for the ramstage.
You may wonder why asan_ctors() is only added to ramstage? This is because the use of global variables is prohibited in coreboot for romstage and thus there is no need to detect global out-of-bounds bugs.
Next steps..
In the third coding period, I’ve started working on adding support for ASan to memory functions like memset, memmove and memcpy. I’ll push the patch on Gerrit pretty soon.
Once, this is done, I’ll start writing documentation on ASan answering questions like how to use ASan, what kind of bugs can be detected, what devices are currently supported, and how ASan support can be added to other architectures like ARM or RISC-V.