[GSoC] libgfxinit: Add support for Bay Trail

Hello everyone. I’ve been working on adding Bay Trail support to libgfxinit as a GSoC project. Yes, as I don’t usually talk much outside of IRC and Gerrit, I would imagine this post would come up as a surprise to most people. Despite the journey being way more difficult than initially foreseen, I eventually managed to get most of what I could test on Bay Trail working, with next to no spaghetti-looking code.

The commits adding Bay Trail support to libgfxinit and integration with coreboot can be retrieved with this Gerrit query. Additionally, the coreboot port for the Asrock Q1900M mainboard used for testing can be found on this Gerrit change.

I ran into several problems while working on this GSoC project, and submitted various fixes and improvements. Links to these commits can be found in later sections. Strictly speaking, these commits are not directly related to this GSoC project, but they spurred when working on GSoC.

Unfortunately, I ran into multiple setbacks, which precluded me from completing everything I had originally planned within the GSoC timeframe:

  • Since I only managed to fix some bugs last-minute, the code has not been formally verified yet. Nevertheless, formally verifying the code before it works and has been reviewed is rather pointless, since it needs to be verified again after amending it.
  • DisplayPort and integrated panel support could not be tested due to inaccessible hardware. I had to take a plane from the university campus to home on June and it was impossible to squeeze both the Asrock Q1900M and the Asus X551MA in my luggage. I decided to bring the Asrock Q1900M, as it is more compact and easier to work with.
  • There was no time left to work on Braswell support. While Bay Trail and Braswell are somewhat related, there are many differences regarding the undocumented parts of the hardware, and there’s even less documentation.

Undeterred by any misfortunes, I am going to finish what I started, come hell or high water.

Project details

libgfxinit is a graphics initialization (aka modesetting) library for embedded environments. It currently supports only Intel hardware, more specifically the Intel Core processor line. It can query and set up most kinds of displays based on their EDID information. You can, however, also specify particular mode lines.

Support for the Intel Bay Trail platform is was missing in libgfxinit. The code hasn’t landed upstream yet, so one would need to fetch it from Gerrit in order to use it. This involves fetching the libgfxinit patches first, using the checkout download option on CB:42359 (the topmost change), and then cherry-picking CB:44071 and CB:44072 into coreboot. CB:44938 and CB:39658 show how to enable libgfxinit for Bay Trail mainboards. Since the available video ports is mainboard-specific, gma-mainboard.ads needs to be adjusted accordingly.

Trials and Tribulations

The hardware is cursed

Getting software to work usually takes some testing, but when said software interacts with hardware, testing becomes essential. And when said hardware is largely undocumented, testing is pretty much the only option. The Display chapters of the graphics programming manuals for these platforms lack the information that matters for libgfxinit. Even the Bay Trail documentation turned out to be incomplete, especially regarding the display PHY and PLL registers. When working on libgfxinit, I soon got Bay Trail to show something on a monitor. However, making that work reliably took much longer than I expected. This was mainly because I needed to spend at least a day or two without looking at the code to see what was wrong with it.

Said PHY and PLL registers are hidden within IOSF-SB, a sideband interconnect network accessed through a mailbox-style interface. To access a register, not only does one need to read or write the register contents, but also needs to program the destination port (address of the hardware block), opcode (which type of read or write) and register offset, and then poll a busy bit until the operation is complete. Of course, this register access mechanism is not described in the graphics documentation, so the only references are existing graphics drivers. Reading someone else’s code in order to understand what documentation should say is, at best, downright painful.

After I managed to get something to show on the screen, I noticed that this would only work on very specific system states. In addition, manually (using the intel_reg utility) writing several undocumented registers before running gfx_test would sometimes help. I eventually figured out that most of the accesses to undocumented registers did not have any effect, because of a blunder in the IOSF accessor library I wrote: I messed up the bitfields when assembling the request register (contains the target port, opcode and some always-one bits), so the accesses would often end up going to the wrong port.

There’s always more bugs

The Bay Trail code in coreboot was only used by a single mainboard: the Google Rambi chromebook/chromebox/chromebase family. Memory initialization is done by a binary-only executable, which contains Intel’s MRC (Memory Reference Code). This binary is simply called “MRC binary” or mrc.bin (the file’s name). However, it is actually an ELF binary, and the Makefile in coreboot will place it at a different offset depending on the file extension. So, Bay Trail has a mrc.elf instead: using the mrc.bin name will place the binary at the wrong offset, and won’t work.

Once this mystery was solved, the MRC on the Asrock Q1900M would not detect any DIMMs. Turns out SMBus support in MRC is broken, so one needs to read the SPD contents into a buffer, and then pass that buffer to the MRC. CB:44092 takes care of that.

Even then, MRC would still refuse to work on the Asrock Q1900M. After some digging, it is because it checks the memory type in the SPD, and bails out if they are not SO-DIMMs or do not support 1.35V operation. The Asrock Q1900M uses full-size desktop UDIMMs, which may not always support 1.35V operation. CB:39568 patches the necessary values in the SPD buffer so that MRC will function as intended.

Externally-induced translocation

I don’t mind running errands or going out in general. However, I do utterly despise having to move and live elsewhere: I have to pack my computers and parts, and I have lots of them. I live in an archipelago, I don’t have my own house nor car yet, and my parents’ home and the university campus aren’t on the same island. Dad usually comes with his car at the start/end of the school year, as I need to move lots of stuff. Oh, and my parents are divorced, so my sister and I go back and forth when not abroad.

Because of the coronavirus outbreak, in-person lessons were suspended for the rest of the academic year. Most people living in the university campus (there’s a students’ residence in there) went back home almost immediately. I didn’t, because I didn’t feel like taking a plane amidst the outbreak and preferred to stay in my cozy server dorm room. However, as there were no more in-person lessons, the residence had to close, and I eventually had to leave. Moreover, Dad couldn’t come this time because he was overwhelmed by work (he was unable to work during lockdown, so everything piled up until the lockdown ended). So, I had to take a plane and leave most of my stuff in the residence, including all of my monitors with digital inputs and one of my two Bay Trail machines, which I had planned on using for GSoC.

And if that wasn’t enough, I’ve had to pack my things again, every week. This means each week only had six useful days, at best. This, plus everything else going on at home, quickly burned me up. It reached a point where I couldn’t bear any longer and had to take a two-week break from coreboot development.

Conclusion

Although there were many unforeseen hurdles and problems around every corner, I would still call this a huge success. Just like university assignments, it has been rushed down to the last minute.

[GSoC] EC/H8S firmware week #5

The T40 is flashing leds! The toolchain is still a little bit tricky. I’m using the debian package gcc-h8300-hms, written a small linker script and took the startup assembly routine from Johann Gysin’s led radiator.

Now I can flash leds. But what about booting the board? I would say it’s enough to put

  • (!MAINOFF) = high
  • FAN ON = high
  • pulse high on (!PWRSW_H8)

But it’s not enough. Also the FAN isn’t starting to rotate. I’ll try to debug every pin this week and solder some debug pins for the 2nd EC (PMHx) to the my modified T40 as well as to an unmodified T42p. The H8S is talking to the PMHx via SPI, while the H8S is the master and is doing bit banging SPI in software, because it doesn’t have a hardware unit for that. I’ll also use these pins for testing my SPI implementation. I’ll try to reuse an open source SPI implementation.

I also asked me if it’s a good idea to port coreboot for the T40 before continuing any efforts to the EC, but it’s a little bit harder, because the T40 uses a LPC/FWH flash in a TSOP40 case. Another option is changing the hardware to a board which is already supported by coreboot like a x60/t60 or x201. But it’s much more harder to access the 8 pins for flashing the EC on these boards.

Before switching to another board, the powersequencing must work and I need a robust recovery way, because when you kill the EC by flashing a new firmware, you don’t get a second chance, unless you solder a lot. Chrome EC fix this problem by splitting the EC firmware into 2 parts. One read-only part and one read-write’able part. Only the second part gets updated and the read-only part can at least boots the device.

Before starting the H8S port for Chrome EC I want to have a bootloader. Because it would improve developing speed. I think implement this is much faster than doing the full Chrome EC support and most of the bootloader code can be re-used for Chrome EC.

I’m also not perfectly sure Chrome EC is the best solution. It’s special use-case is EC, which is perfect. But neither the documentation (I think there is more than one page) nor the bugtracker is public. Thus it makes difficult to use. I’m also not sure if Chrome EC would apply my H8S port into their repository.

GSoC (coreboot): Test interface board complete

Apologies for the late update. The design that I posted in the last post was more challenging than I had thought. However I’m happy to announce that my test hardware that I call ‘coreboot test interface board’ (TIB) is now complete. Only some of the software interface part is remaining in the project. So let me share with you a very quick update of last month. Continue reading GSoC (coreboot): Test interface board complete

GSoC (coreboot): Week 5-7 – Redesigning the test-interface-board

In the last blog post I talked about the test-interface-board. There were some concerns about the use of FT232H chip and extra features like voltage and temperature measurement were not required. Keeping in view all the suggestions and improving things on my side I have redesigned the board.

w567fig1

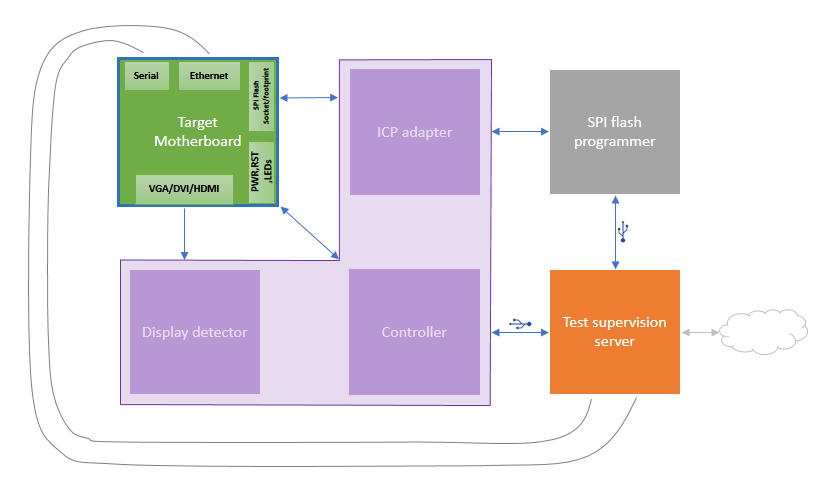
The figure above shows only one target board connected to the test supervision for simplicity. The purple L-block is the test-interface-board. This time, instead of using an integrated flasher I wish to support all existing flashers so I have developed an ICP adapter. An In-Circuit Programming (ICP) adapter contains the firmware flash memory removed from the motherboard and it acts as an electronic change-over switch that connects this flash memory to the motherboard or the programmer as required. It also includes logic-level translation to support as many as possible combinations of programmers and motherboards. The support for programmer voltage is in range 1.2V-5.5V and for motherboard SPI voltage it’s in range 1.65V-3.3V.

As a quick test for VGA initialization I’ve added video detection for Analog video (VGA), DVI and HDMI ports. This checks presence of signals that are only there when video is active. In other words, it checks whether a monitor’s status led would turn green if it’s plugged to the motherboard without actually plugging one. I have prepared schematics, some parts of which are yet to be validated through prototyping. This will all be implemented as an Arduino add-on board (aka Shield) for convenience and the Arduino would act as the controller.

The Serial and Ethernet ports can be connected in the usual way using Serial-to-USB cables, Ethernet cables and hubs. Continue reading GSoC (coreboot): Week 5-7 – Redesigning the test-interface-board

GSoC (coreboot): Week 3 and 4

In the past two weeks I was on vacation and I have been working on what I call “test interface board”. Before I go on to elaborate this I feel there’s a need to discuss the big picture of this project because a lot of things have changed for good reasons and the old terminologies don’t make sense.

System Topology

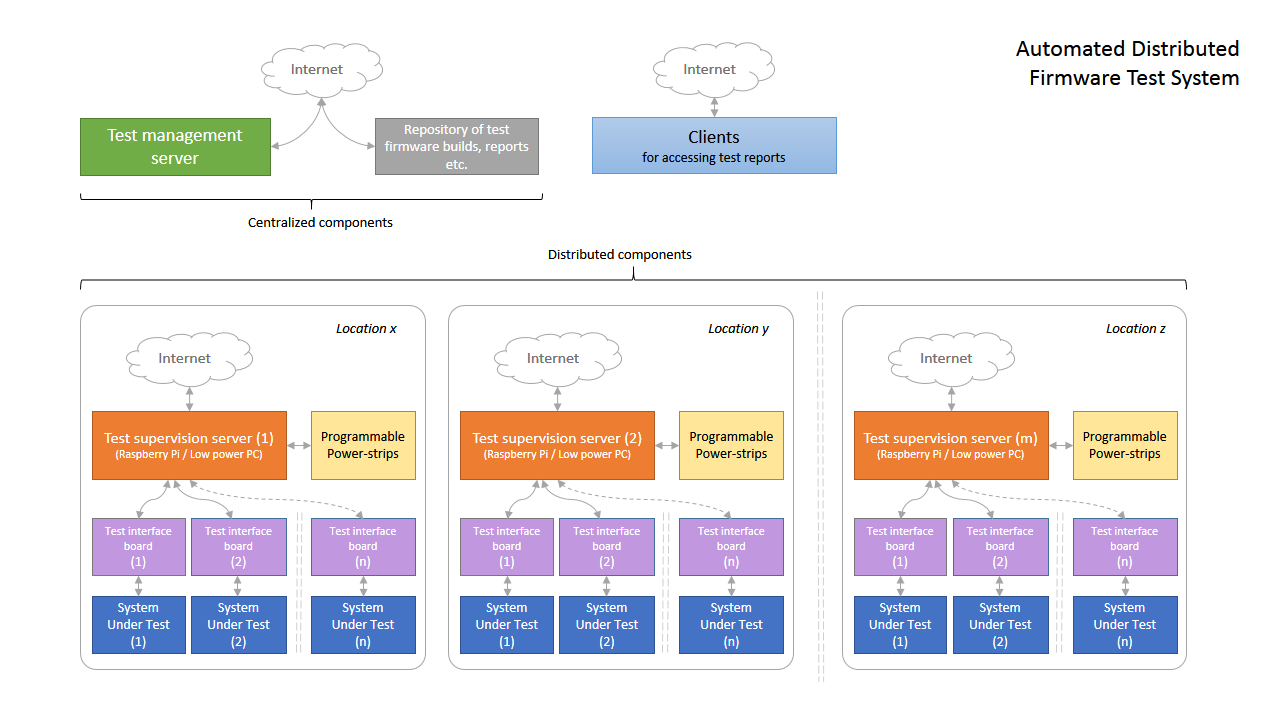
Just to remind, my project is centered on building inexpensive and flexible test-rig for the Automated Distributed Firmware Test System described in Quality Assurance Talk by Stefan Reinauer.

A centralized Test Management Server generates test sequences for remotely located systems under test (SUTs) and this includes controlling and monitoring the SUTs and flashing different firmware builds on them. The test management server coordinates with a repository for accessing test builds and for storing test reports. Test reports are the final and useful output of the whole system and these may be accessed using browser by clients from internet.

A Test Supervision Server is a low power computer that acts as a local housekeeper of SUTs for a given physical location. It connects to the Test Management Server using SSH over internet and executes given test sequences by coordinating closely with the SUTs using a Test Interface Board. Programmable power-strips are provided to control power supply to the SUTs from Test Supervision Server.

My work will be confined to the distributed components for now. I have completed the programmable power-strip block. A future add-on to this block could be integrating active power & energy measurement of an SUT for energy efficiency benchmarking. If this is really desirable it could be done after I finish doing the other parts. Right now I’m working on the Test Interface Board.

Test Interface Board: Behaviour

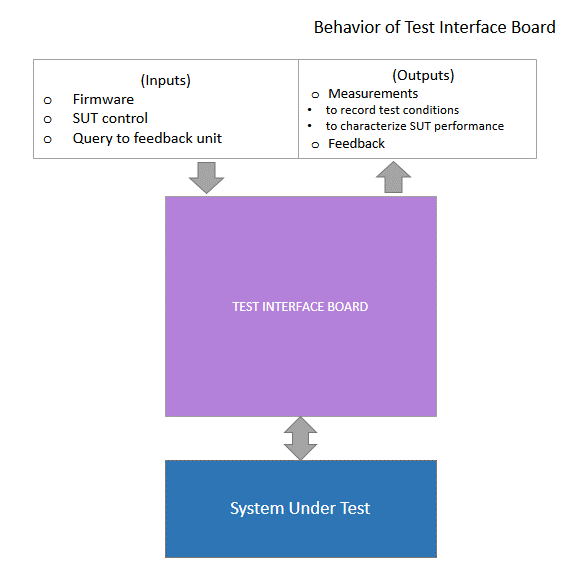
The Test Interface Board provides necessary hardware interface for connecting Test Supervision Server to an SUT. This is necessary to flash firmware to the ROM, to control power/reset sw, to measure PSU voltages and surface temp. of ICs and to take POST feedback if available. Let’s dive into more details to see how this can be done.

Test Interface Board: Detailed box diagrams

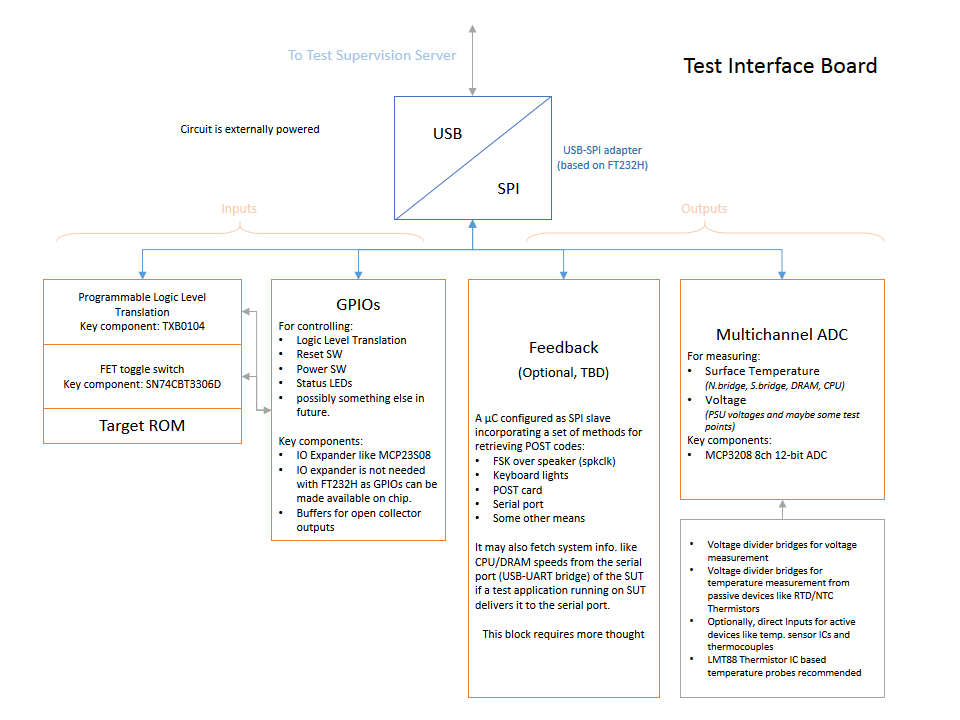
FT232H has a multipurpose serial engine that can be configured as SPI master. FT232H has additional pins that may be used as GPIOs so a GPIO expander may not be needed. The FT232H datasheet states that it offers up to 30mpbs throughput in synchronous serial mode which makes it a fast flashing solution for the given price point (3$). Slave Select (SS) pins can be used to switch between other devices like an ADC that gives voltage and temperature measurements and an optional Feedback microcontroller configured as an SPI slave that gives more information about the SUT. A few GPIO pins can be used to configure Logic Level Translator to ensure compatibility with serial flash of different voltages ranging from 1.8 V to 5V and a GPIO pin will also be used to configure a FET toggle switch (MUX) to electrically detach the serial flash for programming and connecting it back to the motherboard when it’s done.

Notice that I’ve got rid of microcontroller this time. This is because a new microcontroller chip doesn’t necessarily have a bootloader and it needs to be programmed using a dedicated programmer. This adds considerable cost and inconvenience for someone who needs to build only few of these boards. So unless you’re using the optional Feedback module nothing needs to be programmed. Just ordering the board and components and soldering up everything using a 15W iron should be enough to make one of these.

I’m also going to ensure modularity by having small PCBs for each functionality connected to a main-board using headers so that they can be developed independently and used as required. Also, there’s flexibility of choosing temperature probes because it is possible that someone already has good quality probes (that come with professional DMMs).

And a few comments about the ADC I’ve chosen – The ideal choice of ADC for voltage and temperature measurements where the sampling period is large is an integrating ADC. An integrating ADC charges a capacitor from the input signal for a known period of time using an opamp integrator then it discharges that capacitor using a known negative reference voltage. The time it takes to discharge the capacitor is proportional to average value (area under curve) of input signal over sampling period. It’s theoretically simple but it needs use of precision external components and a microcontroller program to work. This is the technique used in professional DMMs (True-RMS) and bench power supplies (for feedback). Delta-Sigma ADCs are common and cheap these days but they don’t average the values over time like integrating ADCs. However, they can provide acceptable accuracy for our application and MCP3208 is a good candidate.

Please see the figure for more details and let me know if there are concerns or suggestions. I’ll post more stuff and schematics in a couple of days.

GSoC (coreboot) Progress till week 2

As you might know my GSoC project is about making a test rig that can make coreboot test systems more accessible to a coreboot test server. This test rig enables coreboot test server to interact with the systems under test (which may be remotely located) in the following ways:

  • Power supply control (discussed in this post)
  • power/reset switch control, voltage and temperature readouts, firmware flashing on serial flash (to be done next)
  • provision for POST feedback (later)

With this project I’m hoping to create an environment where developers will be able to conveniently connect their systems to the coreboot test server for testing at their own place. This is why I like to call it a distributed test environment as it facilitates mass testing without the need to maintain a dedicated testing facility.

So this week I will present a nice and easy solution for power control of the coreboot test systems. I would call this device a ‘programmable power strip’. Before going to the final solution let me first walk you through all the routes that I’ve taken in order to answer some potential questions that may arise. Read on…

Hello :)

I’m Ayush Sagar from India and I will be working with coreboot this summer on the project “Test set-up for the coreboot distributed firmware test environment featuring greater extensibility, enhanced automation, concurrent high speed firmware flashing and decentralized operation“ under Google Summer of Code 2013.

I’ve almost completed my graduation in Electrical & Electronics Engineering and by training I’m skilled at developing SCADA applications and ladder logic programs which are used for power system and factory automation. However my interests are widely scattered around physics, electrical engineering and computer science. I have been repairing consumer electronics and computer hardware on component level since a very long time as an earning hobby. It’s quite profitable here even today as most people are reluctant about throwing away their belongings. I’m also passionate about programming but I’m new to free and open source software development.

Continue reading Hello 🙂

Hello world

Hello World! I am Alexandru Gagniuc, and I’m a free software addict.

superboosted2

I got involved in coreboot in early 2011. I had an old VIA board and just thought I’d try coreboot on it. What could go wrong with an unsupported board? I ignored the “everything” part, and nothing went wrong. I never finished that port, but that’s of less relevance. I learned “how things are done around here”. Besides starting to make small contributions here and there, I was also lucky enough to catch an NDA with VIA and a free EPIA-M850 board. The only thing supported on that board was the superio. Today, we can initialize DDR3 memory and boot Linux with it.

My journey was perilous. I have met a great number of wonderful people along the way. Actually, that’s where I learned most of what I know. My only useful skill when I arrived was knowing how to read C syntax. I have since contributed to a modest number of other projects, most notably sigrok and libopencm3 (I’m the same guy that added support for LM4F there). I just like making hardware come to life, it seems.

This summer, I will be bringing you a tool to unlock your bricked LPC and FWH flash chips. I need a break from needing to program 30 years of history, and needing to deal with thousands of registers in several different IO and memory spaces. I’ve chosen Cortex-M as my operating table. No port IO, no configuring memory regions, no interrupt handlers, no memory initialization, no “any of the one million things that can silently break”. Everything is memory-mapped and the number of registers is so insanely small, that it makes sense to #define them all. It’s small, it’s readable, it’s not confusing. It’s beautiful. It’s the best coding vacation anyone can take from coreboot.

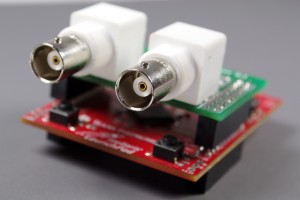
I will use a Stellaris Launchpad as my patient. For anyone coming late to the game, the new name is Tiva C Launchpad. I’ll use the Stellaris because

  • it sounds a lot cooler than “Tiva C”
  • the name actually fits well next to “Launchpad”
  • I was able to snatch a couple of them last year for $5 a piece.
  • The picture at the top would not look as cool if it were a “Tiva C”

I’ll turn the innocent looking red slab into a mean lean, programming machine. We’ll start with LPC. Emulating a 33MHz 4-bit bus should be fun (not counting the obscene cost of coffee, and red eyes due to sleepless nights). I didn’t say it will be easy, but as Jimmy McMillan once said, “the fun is too damn high!”

Next time, I’ll tell you how to set up the development environment, and how to put some firmware on the board.


GSoC: Spice Payload report

Yeah! it`s came the time to write another report on GSoC status. In fact I`ve – intentionally – postponed it for quite some time and it doesn`t exactly mean there was a lack of informative emails between me and Marc(my mentor).

The need to finish some stuffs justifies – in some ways – the aforementioned delay. I understand you don`t need to report you aren`t done with something, a mail stating “I`m not done yet” would be enough – well, maybe not anyway…

OpenEmbedded Journey

With the second half of my project I jumped in the OpenEmbedded ecosystem and believe it, I`ve loved to get in touch with.

Putting my hands on OE is something I`ve planned for some time, I just hadn`t had the time to do so.

OpenEmbedded is something amazing, and it does what I realized years ago when I worked with gentoo. I always saw gentoo as a great meta-distribution, something you can bend and forge as you need – customizing it according to your needs.

Despite all the conceptual things touching OE wasn`t as easy as I initially tought it would. Bitbake(the great maestro behind OE) was designed with portage in mind and theoretically it was I good advantaged to me – look, theoretically.

Nothing is exactly smooth as you plan, you`ll always get troubles in the way – with OE wasn`t an exception.

OE transitions and yocto project

One of the biggest problems I faced was mainly due the transition the OE project is getting through. The docs(Getting started wiki page for example) are out dated and you get conducted by the old code base, and trust me, it`s not a good way to get started.

My first two weeks was full of crazy hacks, searching for old tarballs, setting up local source repositories, doing everything I could to make that thing to work – it was a bad race doing my best to proof the howtos.

The true is OpenEnbedded has moved to what we name bblayer, it`s a bitbake feature to ease to extend a base system. The intention(as I see) is to keep a minimal, clean and stable set of core packages and yet make it possible to “third party” vendors to append it to fit their needs.

The yocto project has extensively used OpenEmbedded as their base system, both the projects have exchanged a lot and sometimes you loose yourself if you`re touching one or the other. One of the tools provided by yocto project is Poky – which`s actually an OE layer.

There isn`t plenty of docs describing how the bblayer and bbappend work – the bitbake docs aren`t much precise and the OpenEmbedded barely mention it, yocto just describes how it`s fit within poky(or something close to that).

I would really like to recommend newcomers to first play with poky then later consider starting a new third-party layer.

The project as a bblayer

A third party layer is what best fits my project, not exactly a full yocto/poky layer, maybe and extension of it or not even that but an own layer itself, to accomplish that I had to experiment a lot, setting the environment up and watching how everything get together.

Packaging

After many years not touching a single ebuild and having never touched a bb package I jumped in the task to pack some components. The spice client has a bunch of dependencies – of course, I hadn`t to pack everything myself, a great number of things were already done.

Among the things that got me longer then I expected was cyrus-sasl, the old OE tree had it packaged but it was an old version – should I mention it was broken as well?

So, bringing the recipes wouldn`t be enough but I would have to fix things up, once fixing stuffs was the only alternative I decided to upgrade it to the latest version 2.1.31.

Anyway, it brought me a lot of work to pick patches to fix its building and fixing what hadn`t got fixed already. My final PR was 177 what means I came through 177 builds, debugging, testing and working everything around.

The cyrus-sasl code has a bug introduced after 2.1.21, it wasn`t possible to build it –with-static. I did an ugly and ridiculous fix. Everything I found out there – searching the internet – was even uglier. Suggestions to run make twice was one of them. The build system was kind of messed up.

The other packages weren`t so painful and I could quickly move forward.

Slimming the image

I still have to slim few things, I need to cut some X11 packages I included in the image, append the yocto kernel with my own .config and write a small shell script(or something smarter than that) to launch the spice client.

BuildRom

The first thing I worked on in the beginning of my project was buildRom, I wanted to bring all the tasks involved on building the OS image and bios/firmware into to it. But, with my move to OE for building the OS image I realized I could go the reversed way and bring the tasks for building the bios/firmware to OE.

Now I`ve manually packaged the things but have already started to write bbclass to controll bios/firmware + image building and packaging them. I see it as a second generation to BuildRom project, a OE layer with coreboot bb packages and recipes plus the needed bb classes.

Conclusion

After the great effort I had, getting in touch by the first time with OE, I feel comfortable to say it was a good experience to me, I realized many possibilities. I`m really happy with everything I learned on the path and I`m sure I still have a lot to contribute to Coreboot and OE as well.

GSoC2011(Week 9): boot ARM using coreboot to romstage

Hi all. Here I come again. With one week’s work, coreboot now can add romstage to the romfile, pass control to the romstage and find ramstage. I add a new way using a binary file to add stage to a rom file. Since I have not got an idea of how to store the hardware information, no hardware initialization is done now except the console. Following I will show you some snapshots:
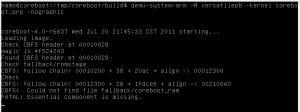
This is a romfile without ramstage so it hangs at finding it:

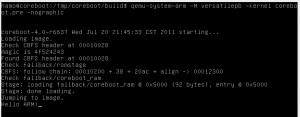
This is a romfile with a simple ramstage. The ramstage code only sends a string “Hello ARM!” to the console then hangs there. It is compressed using LZMA in the romfile and should be decompressed and copied to the RAM at address 0x5000. This romfile is for testing the decompress function and move-jump function.

Next week, I will work on the ramstage. It is one of the hardest parts since we will deal with the hardware information. I need to design it and implement it. I want my code to be tested and reviewed early for that it is not only about implementation but also design. One could change an implementation with a low cost but couldn’t change a design with a low cost.
Thanks to God and Thanks to all the coreboot developers. Working with you all is so happy and fantastic!